
La Cabane Éclatée aux 4 Salles, Daniel Buren at the Gori collection
What is Serverless?
In previous posts we spun up virtual machines to work in the cloud, but the cloud can also perform specific functions for us without us having to run any servers, so called serverless computing. The servers providing the services still exist, but they are managed by the cloud provider while we deal with the services directly.
This has the advantage that we do not have to administer any servers (for example by setting up firewalls). We are also not charged for a continuously running server so there may be cost savings. On the other hand rather than do something quite general, and commmon to most cloud providers, like managing Linux servers, we have to use techniques that are more provider specific increasing the risk of lock-in. Working with functions triggered by events and separate services also introduces some complexity.
Due to these and other issues it is probably true that serverless hasn’t taken off as much as previously anticipated. Nevertheless it felt worth learning something about it and unbundled cloud services in general. Partly just to make a conceptual switch to a different way of doing things, but also as my current and previous data science employers make some use of it.
Serverless example with AWS
I decided to try a serverless approach to collect data from the Twitter API as a simple project to learn more about it. This involved a variety of components from Amazon Web Services (AWS):
-
Lambdas which are functions triggered by events
-
Simple Storage System (S3) which allows us to create buckets that can store objects. In this case the raw json that we are getting from the API calls.
-
DynamoDB which is a no-SQL database. This allows us to take the json data returned from the API calls and input it into a database.
-
CloudFormation A template for launching services in AWS which specifies the services that we want and the security permissions they have.
-
AWS Systems Manager Parameter Store A way to store configuration information and secrets.
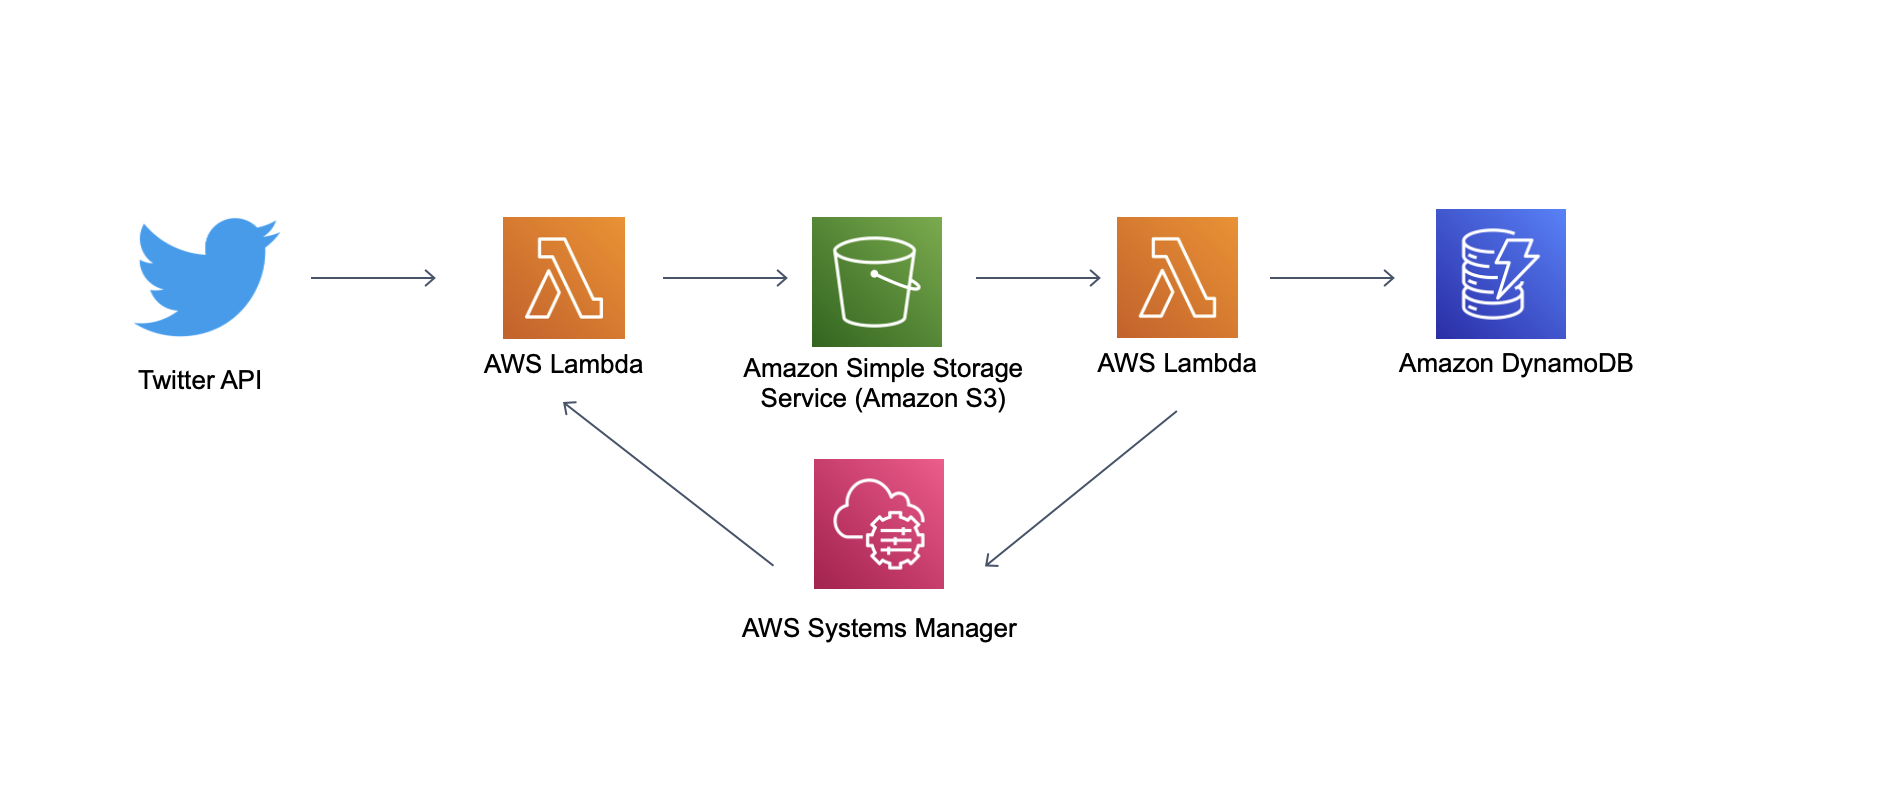
We will use a lambda function to schedule regular calls to the Twitter API. The json returned from the API calls is written to the S3 bucket. This event triggers another lambda function which writes the json to the DynamoDB database. The systems manager is used to pass information from one lambda function to another.
Following this requires an AWS account and probably some basic familiarity with the AWS console and services, particularly as there is a cost involved (see warning below).
We cover:
1. installing the tools used to manage the project
2. the overall project structure and its two main parts
3. deploying the project
4. monitoring the project
5. how the data collected can be seen in the AWS console
6. removing the project
This is intended as a simple example to learn about serverless, rather than an optimised collection pipeline, if you have suggestions as to how it can be improved while keeping things relatively simple please let me know.
A variant of the usual Cloud warning At time of writing the AWS Lambda free tier in the amazon zone eu-west-2 includes one million free requests per month and beyond that it costs $0.20 per 1M requests see https://aws.amazon.com/lambda/pricing/. This means that, in principle, serverless should cost very little as long as the number of requests is low. In the example here it is probably significantly cheaper than having a virtual machine continuously running to make the API calls. However, in the event of large number of requests, perhaps by accidentally getting a lambda function to call itself and/or incurring high data storage costs this might not be true. Until AWS implements the budget cap that everyone wants, as always, the costs of cloud services should be closely monitored and services turned off when not used to avoid incurring unwanted costs.
1. Installing the tools used to manage the project
To manage the data collection system we will use the Serverless framework and the AWS command line interface (CLI) to allow us to interact programmatically with the cloud. To install Serverless:
$ npm install -g serverless
This requires Node which if not already installed can be obtained from https://nodejs.org/en/.
Details on how to install the AWS CLI are here.
For these to be usable you will need to link them to your AWS account.
To install the python packages we will be using in a serverless environment, we also need to install the Serverless plugin: serverless-python-requirements
$ serverless plugin install -n serverless-python-requirements
Although we are using the Serverless framework with AWS, we could also use it with another cloud platform that offers serverless services like Google Cloud or Microsoft Azure, the details of the implementation would though be different.
2. The overall project structure and its two main parts
The serverless project consists of two main parts:
1. The CloudFormation template A yaml file (serverless.yml) that sets out the services we want to use, their security permissions and when lambda functions will be triggered.
2. The Python handler script that defines the lambda functions This script (handler.py) creates the lambda functions that are triggered by events and does the work of collecting and storing the data.
These two files should be saved together in the project folder. Running:
$ serverless create --template aws-python --path api_call_serverless
will create a folder called api_call_serverless with blank templates for both (Using sls instead of serverless will also work). We cover the CloudFormation template and python script in turn.
2.1 The CloudFormation template
In our example shown below this consists of 5 parts:
- Gives the name of the service the template is defining, the aws user/profile that can run it, the cloud provider details and the programming environment we are using (in this case Python 3.9)
- Defines the security permissions of the Identity Access Management (IAM) roles
- Defines the lambda functions and the events that trigger them
- Sets up the DynamoDB resources that are needed
- References the plugin needed for the Python libraries
# This CloudFormation file (serverless.yml) configures the resources and lambda functions used

# Part 1: The service name, the cloud provider details and the profile that is allowed to run it.

service: serverless-api-call-example
provider:
  name: aws
  runtime: python3.9
  profile: serverless_test_user
  region: eu-west-2

# Part 2: The IAM role statements

  iamRoleStatements:
    - Effect: Allow
      Action:
       - s3:PutObject
       - s3:GetObject
      Resource:
       - arn:aws:s3:::serverless-api-data-collection/*
    - Effect: Allow
      Action:
        - dynamodb:PutItem
        - dynamodb:GetItem
        - dynamodb:DescribeTable
      Resource:
       - arn:aws:dynamodb:eu-west-2:*:table/apicallstore
    - Effect: Allow
      Action:
        - ssm:GetParameters
        - ssm:PutParameter
      Resource:
        - arn:aws:ssm:eu-west-2:*:parameter/last_tweet_id

# Part 3: The lambda functions and the events they are triggered by

functions:

# The function that calls the API every 30 minutes
  api_caller:
    handler: handler.api_caller
    events:
     - schedule: rate(30 minutes)

# The function that writes to the database when an item is added to the named bucket
  write_to_db:
    handler: handler.write_to_db
    events:
      - s3:
          bucket: serverless-api-data-collection
          event: s3:ObjectCreated:*

# Part 4: The resources that are used

resources:
 Resources:
    apicallstore:
      Type: AWS::DynamoDB::Table
      Properties:
        TableName: apicallstore
        KeySchema:
           - AttributeName: id
             KeyType: HASH
           - AttributeName: written_at
             KeyType: RANGE
        AttributeDefinitions:
           - AttributeName: id
             AttributeType: N
           - AttributeName: written_at
             AttributeType: S
        ProvisionedThroughput:
          ReadCapacityUnits: 30
          WriteCapacityUnits: 5

# Part 5 the dependencies that are used
# The python requirements plugin is referenced so we can import python libraries
plugins:
  - serverless-python-requirements
The profile the template is linked to
Here we have set up an IAM profile called serverless_test_user. If you omit the profile line that references this in the yaml and deploy it with administrator rights then the stack should launch as the administrator has all the required privileges. However, in general it is considered better to create a specific IAM profile with restricted privileges, so that in the event the profile is compromised and/or the profile accidentally trys to do something you’d rather it didn’t (e.g. spin up lots of expensive virtual machines) what it can do is restricted. The IAM roles that follow in the yaml enable the profile to do certain activities for the project within the scope of the permissions set up for the profile when it was created.
To link the serverless_test_user profile with the command line, take the associated key (k) and secret (s) generated when the profile is created and input them into the following where the XXXs are shown:
$ serverless config credentials -p aws -k XXX -s XXX --profile serverless_test_user `
The IAM roles
Each IAM role has the following format:
- Effect: In this case - what the effect of the IAM role is. Here it is to “Allow” the profile to do certain activities
- Action: The action that the role allows. We want the permissions granted to each resource to be the minimum needed. Here we can get and put objects into the S3 bucket and put items in the database and get and put information in the systems manager.
- Resource: This covers the resources that the action is allowed to effect. In this case the S3 bucket
(serverless-api-data-collection)the DynamoDB table(apicallstore)and the systems manager variable(last_tweet_id)that we are using.
The lambda functions
The lambda functions are identified in the yaml by name of each function and the event it is triggered by. The two functions (which are defined in handler.py) are:
- api_caller which calls the Twitter API and is set to run every 30 minutes
- write_to_db which is triggered when the json file returned from the API call is added to the S3 bucket, which then writes the results to the database.
The Resources in this case the DynamoDB database. Here we provision a table called apicallstore, we have an id key and a range key which the data is sorted by and which we set to be the time the tweet was written to the database.
We have a write capacity of 5 which represents 5 writes to the database per second, for an item up to 1 KB in size (A kilobyte being roughly a page of text - so should be close to a tweet and its metadata).
We want to read in the data collected that we are writing incrementally so we have a larger read capacity.
We need to enable the importing of the Python libraries we are using (here the Twython library to make the API calls) using the plugin serverless-python-requirements.
A python requirements.txt file with the dependencies should be saved to the project folder so that the plugin can find the packages to install. This can be generated from within a virtual environment with the project’s dependencies installed by running $ pip freeze > requirements.txt.
The requirements file (requirements.txt), the CloudFormation file (serverless.yml), the Python handler file (handler.py) and the Twitter authentification details (tweet_auth.py) are the four files in the project folder prior to deployment (which will generate some additional files). When the project is deployed these are zipped together and uploaded to an S3 bucket in your account so that AWS can run it.
2.2 The Python handler script that defines the lambda functions
The Python script shown below specifies tha lambda functions. The functions have the event and context format which are the standard arguments for python lambdas. The event is the data that’s passed to the function upon execution and context provides information about the current execution environment.
The Twitter authentification details are stored in a tweet_auth file which we import. Using the logging library we set up some logging to monitor the stack as it is triggered.
api_caller This is the function that calls the Twitter API which is triggered at regular intervals as specified in the serverless.yml. It searches for the words contained in the Python list (search_terms). If the function can access the last Tweet id collected it uses this in the API call to
get later tweets.
write_to_db This function, which is triggered by the api_caller writing the json to an S3 bucket, takes the returned tweets, extracts the data we want (the last tweet id, labelled max_tweet_id) and then writes them tweet by tweet to DynamoDB which parses the json for us automatically along with the time the write was done.
The last tweet id is written to the systems manager overwriting the previous value.
Dealing with the lack of state in serverless
In serverless we do not have any record of state as such. Here this is an issue as we want to use the id of the last tweet that we have already collected so we can input into the next API call that is made later.
As far as I can tell there isn’t a complete consenus on how to handle variables that we want to temporarily store. Here we store the value of the last tweet id to the Systems Manager with write_to_db, so that it can then be accessed by api_caller.
import logging
import json
import time
import hashlib
from datetime import datetime
from decimal import Decimal
from tweet_auth import *
from twython import Twython
from boto3.dynamodb.conditions import Key
import boto3

# This python script (handler.py) specifies the lambda functions

logger = logging.getLogger()
logger.setLevel(logging.DEBUG)
logger.info("The handler started")


# The words that we are searching the tweets for. This can be a python list.
search_terms = ["learning serverless"]


def api_caller(event, context):
    """
    Calls the Twitter API using the value of the last tweet id where it exists
    """
    twitter = Twython(APP_KEY, APP_SECRET, access_token=ACCESS_TOKEN)

    # Connect to systems manager
    ssm = boto3.client("ssm", "eu-west-2")
    # Looks for the last tweet id saved and makes and API call with it as an input if available
    try:
        last_response_id = ssm.get_parameters(Names=["last_tweet_id"])
        logger.info("here is the id" + str(last_response_id))
        call_results = twitter_search(
            q=search_terms, result_type="recent", count="100", since_id=last_response_id
        )
    except:
        logger.info("calls the API without using the value of the last tweet_id")
        call_results = twitter.search(q=search_terms, result_type="recent", count="100")
    # Gets the date and time
    timestr = time.strftime("%Y%m%d-%H%M%S")
    # Connect to s3
    s3conn = boto3.client("s3")
    # Upload the api call result to the bucket serverless-api-data-collection
    s3conn.put_object(
        Key=timestr + ".json",
        Body=json.dumps(call_results),
        Bucket="serverless-api-data-collection"
     )

    response = {"statusCode": 200, "body": timestr}
    return response


def write_to_db(event, context):
    """
    Function that is triggered by a file being added to the S3 bucket. It extracts the json and puts it into database
    """

    # Gets the bucket name
    bucket = event["Records"][0]["s3"]["bucket"]["name"]
    # Gets the json file _name
    json_file_name = event["Records"][0]["s3"]["object"]["key"]

    # Get the information on (and from) the file that has just been written to S3
    logger.info("The bucket " + bucket + " has a new file")
    logger.info("The new file is = " + json_file_name)
    s3_client = boto3.client("s3")
    json_object = s3_client.get_object(Bucket=bucket, Key=json_file_name)
    jsonFileReader = json_object["Body"].read()

    # converts json into dictionary
    data_dict = json.loads(jsonFileReader, parse_float=Decimal)
    # extracts the value of the largest tweet id
    max_tweet_id = str(data_dict["search_metadata"]["max_id"])
    logger.info("This is the " + str(max_tweet_id))

    # Stores the value of the last tweet id to the systems manager
    ssm = boto3.client("ssm", "eu-west-2")
    try:
        new_string_parameter = ssm.put_parameter(
            Name="last_tweet_id",
            Description="the id of the last tweet collected",
            Value=max_tweet_id,
            Type="String",
            Overwrite=True,
            Tier="Standard",
            DataType="text",
        )
    except:
        logger.info("saving the last tweet id failed")

    # Connects to dynamodb and the table apicallstore
    dynamodb = boto3.resource("dynamodb")
    table = dynamodb.Table("apicallstore")


    # Loops through the items and write them one at a time to the table at the rate of 5 a second
    for item in data_dict["statuses"]:
        # Adds a field to the json with when the data is being written
        item["written_at"] = datetime.now().strftime("%m/%d/%Y, %H:%M:%S")
        item["max_tweet_id"] = max_tweet_id
        time.sleep(0.2)
        table.put_item(Item=item)
    response = {"statusCode": 200, "body": "Items written"}

    return response
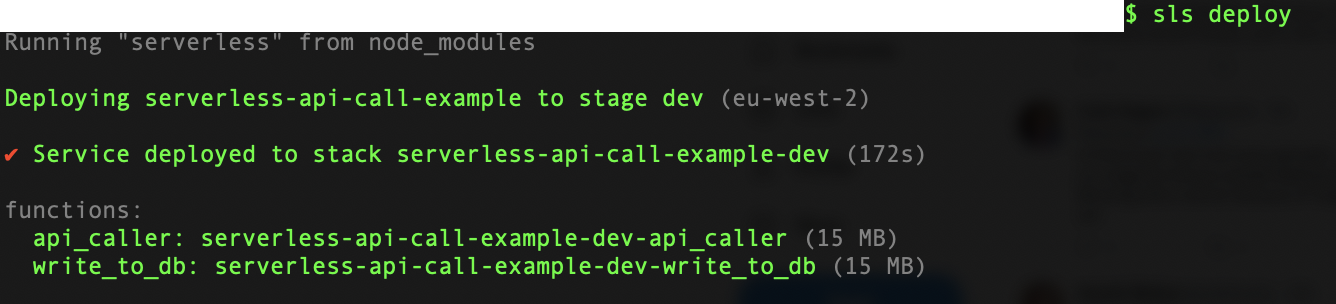
3. Deploying the project
To launch the stack from the folder that contains the CloudFormation template and python handler script we run:
$ serverless deploy
This should take a few minutes and result in something like the text below (some computer specific information has been removed).
 If we want to make some changes to update one of the functions, then this can be done in isolation and is much faster than redeploying the full serverless stack. In the case of updating the function
 write_to_db
$ serverless deploy --function write_to_db
It is also possible to run functions individually. This won’t work for write_to_db as it needs to have the event of a file being added to the bucket to be triggered, but we can run api_caller
where the function is referenced by the -f (in long form –function) with:
$ serverless invoke -f api_caller
4. Monitoring the project
To see the logs relating to a given lambda function run the following with a reference for the associated lambda function, here write_to_db which is referenced by the -f beforehand:
$ serverless logs -t -f write_to_db
The -t tails the logs, printing the text output of new logs to the console as they are triggered.
To get the schema of the table:
$ aws dynamodb describe-table --table-name apicallstore
5. How the data collected can be seen in the AWS console
To see the data in the AWS console, log into the console and go to DynamoDB under the Services tab, then navigate to the Tables tab.
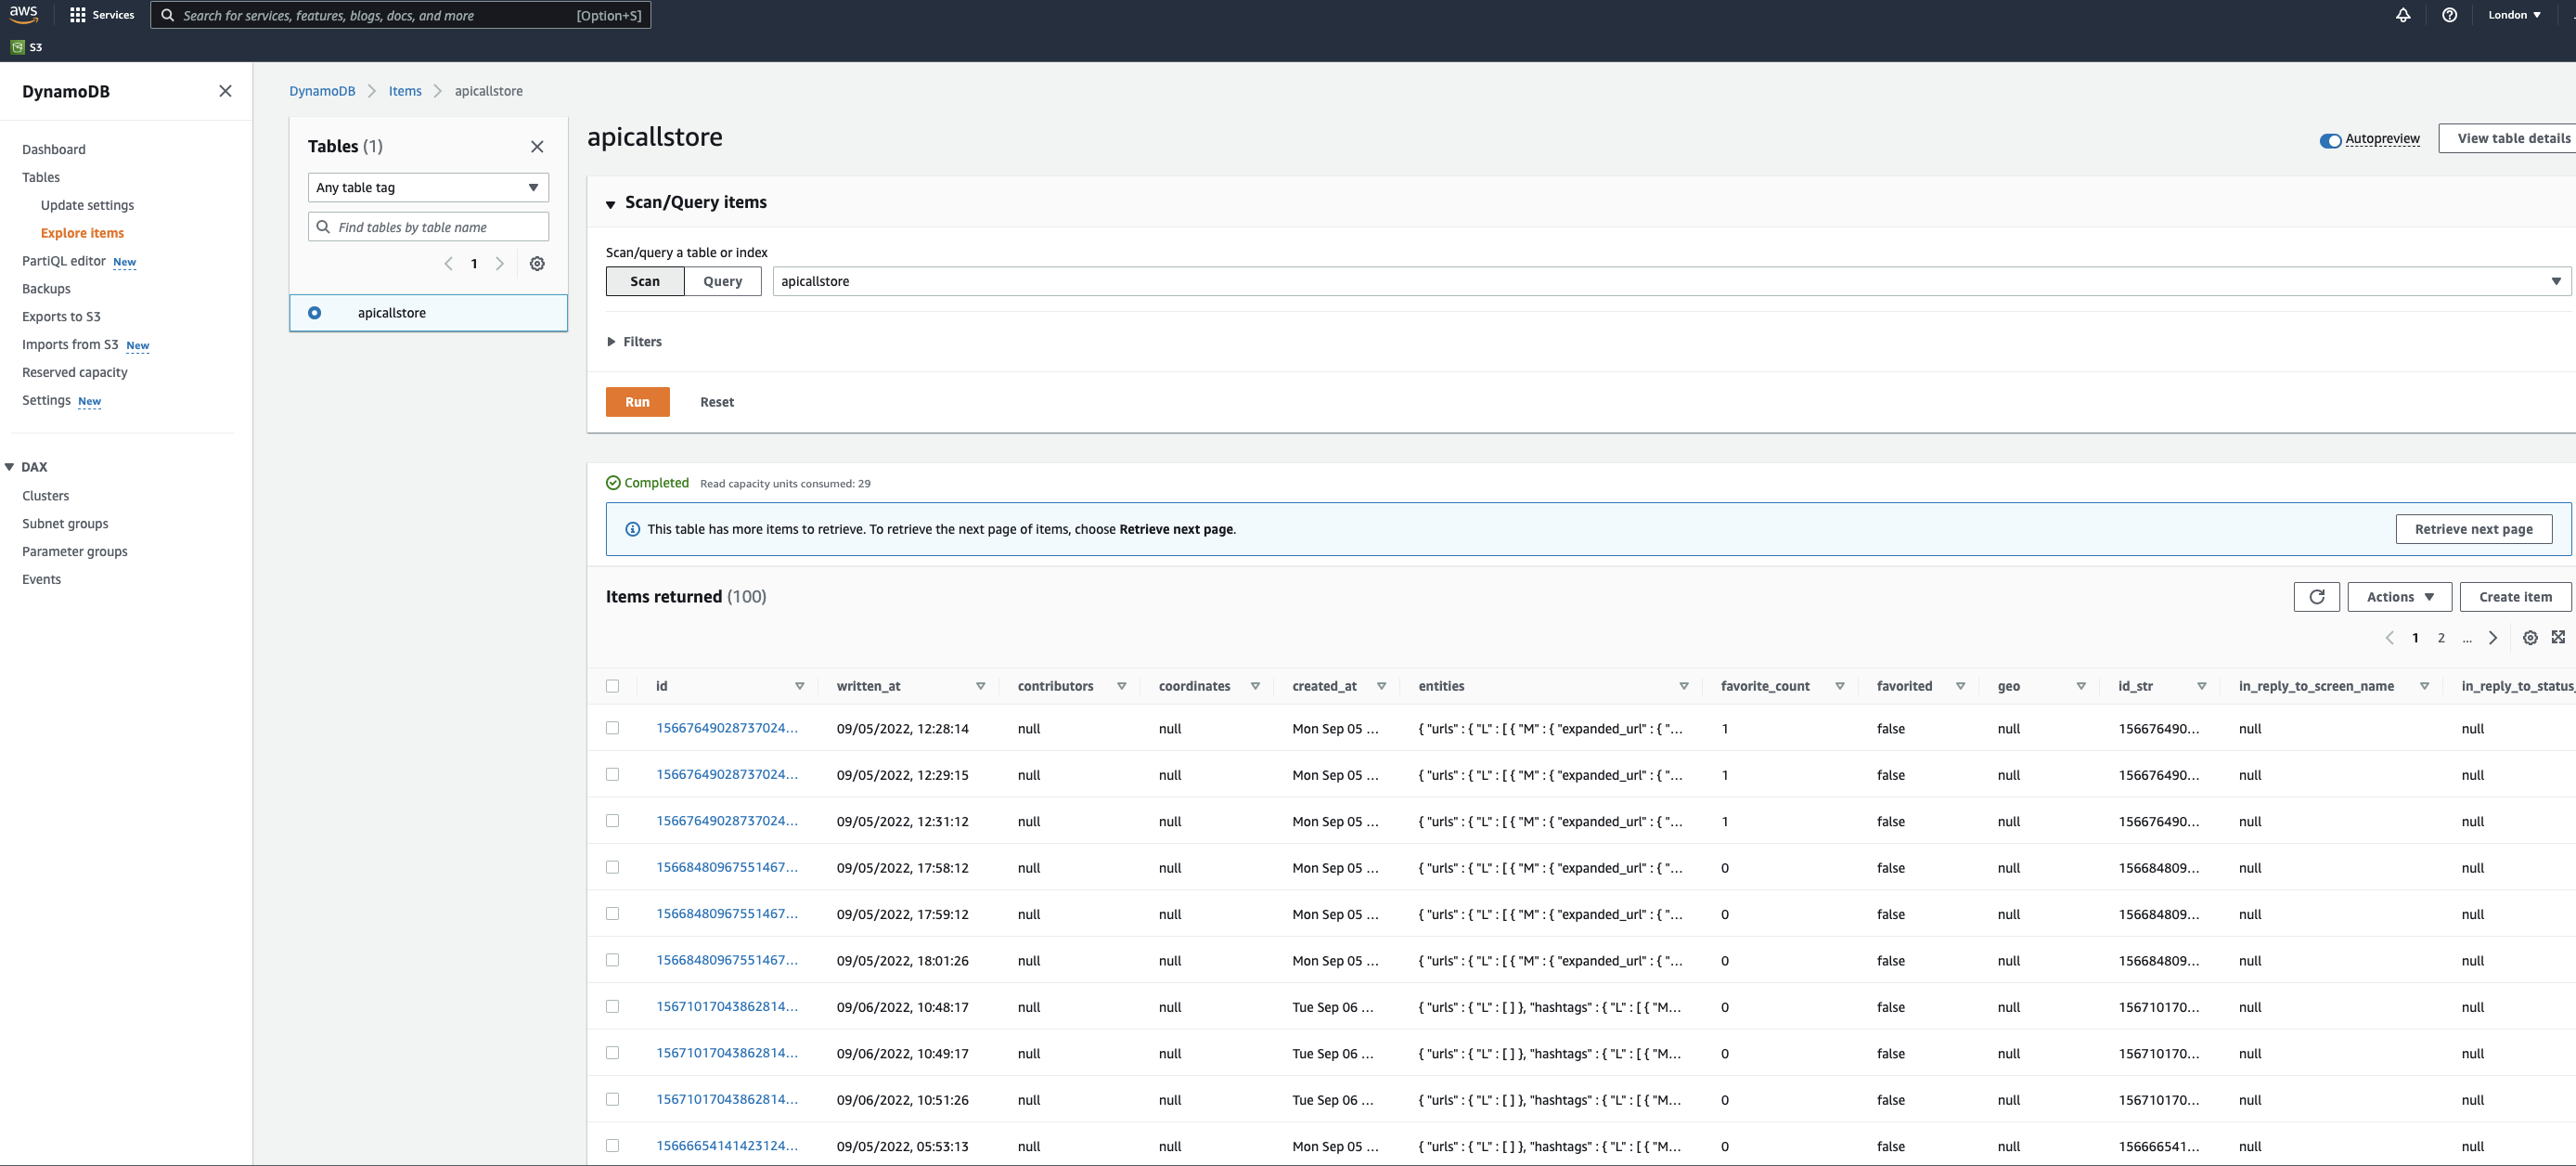
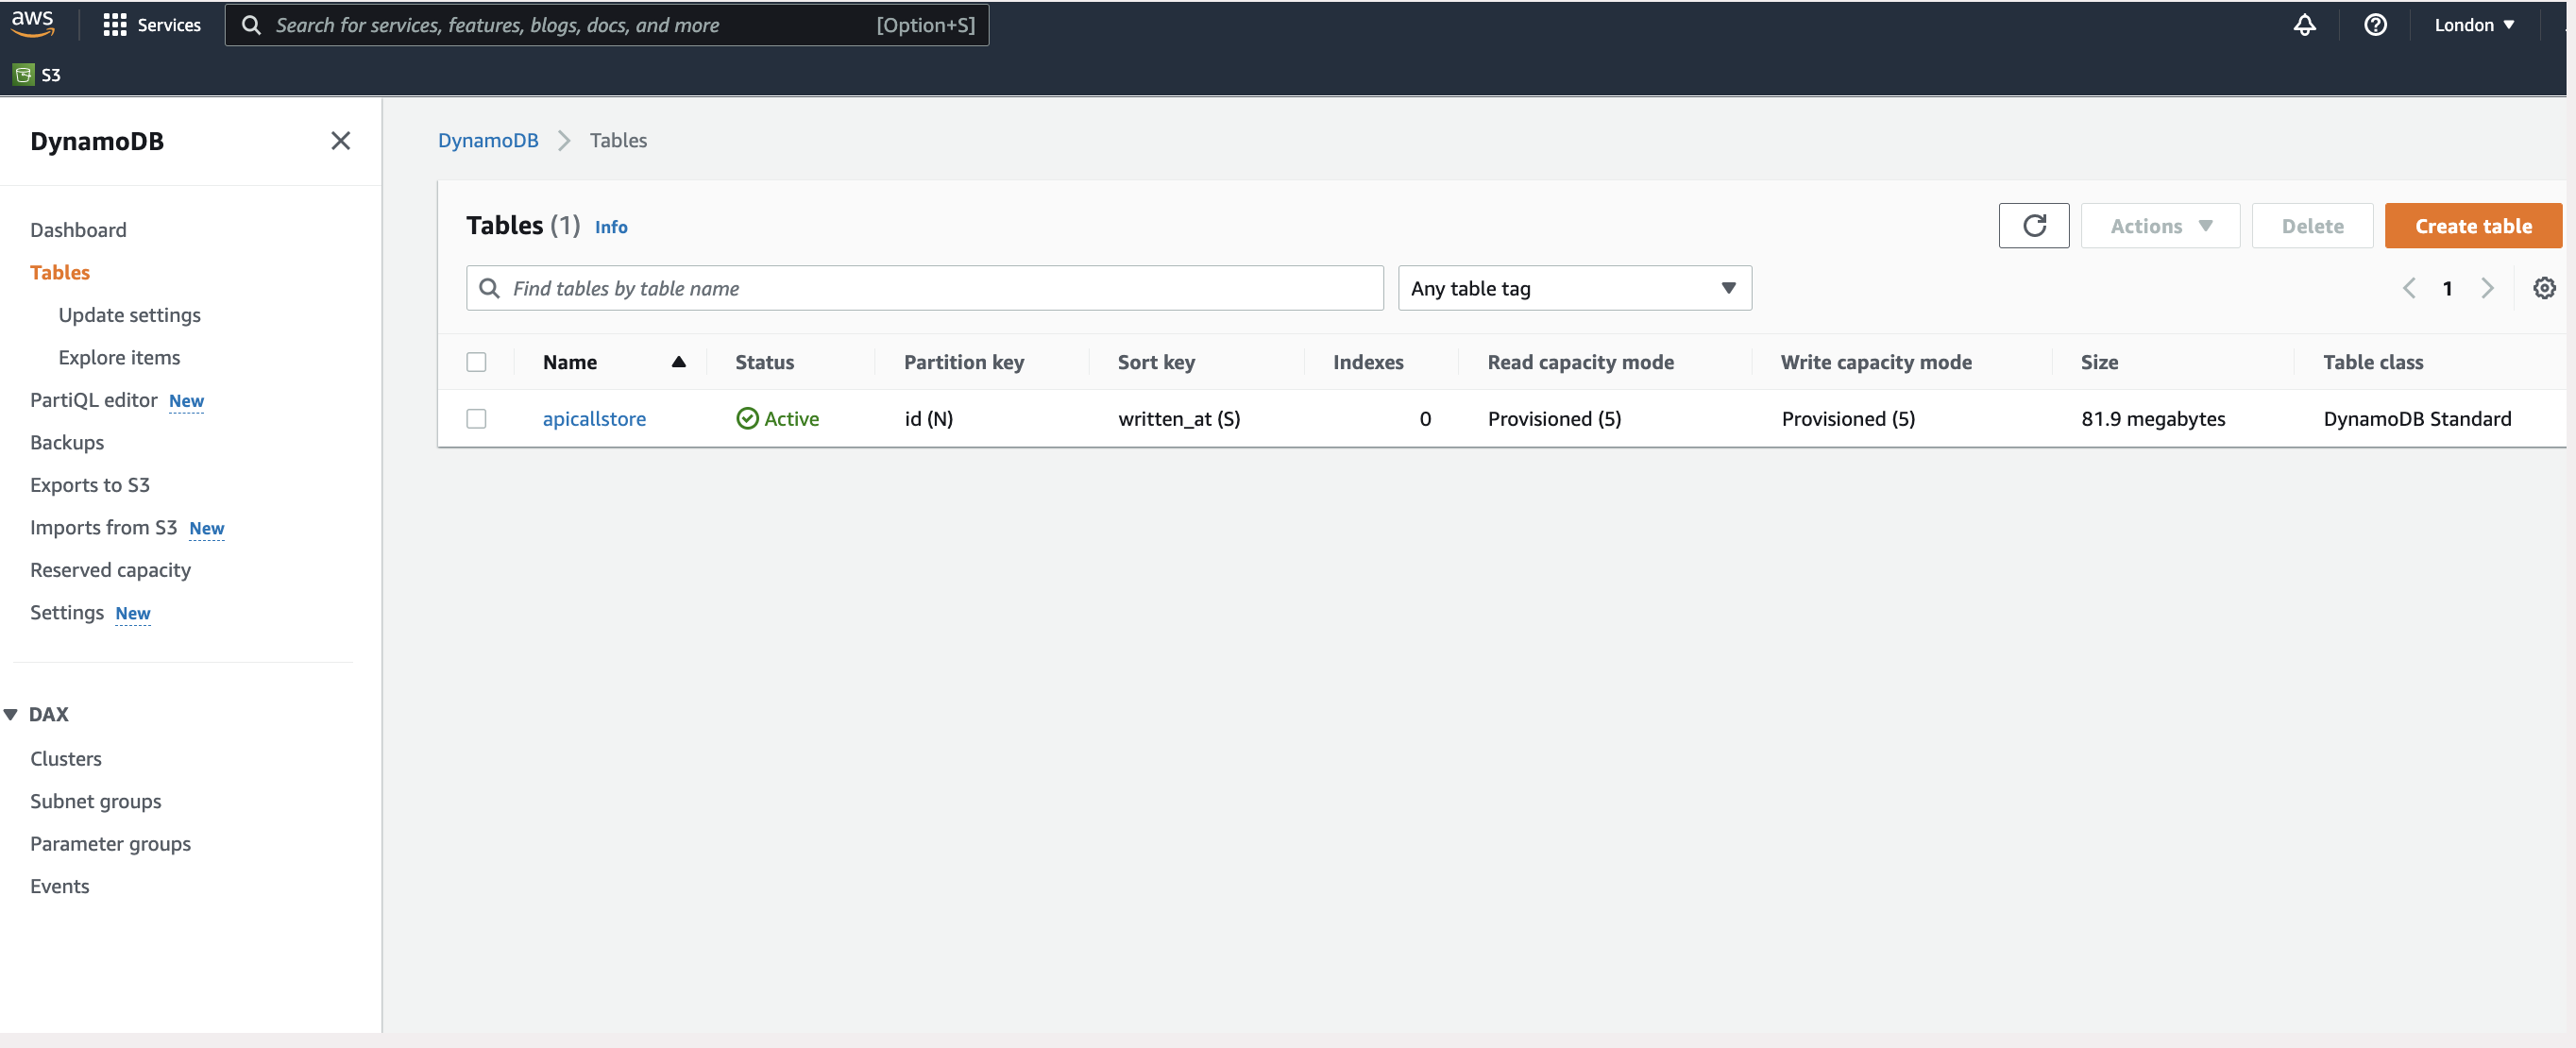 If you click on the table name apicallstore and then the Explore Table Items on the next page you will be directed to a page where you can see the data in the DynamoDB table.
If the stack is deployed and looks as if it is working, but nothing is visible check that the page is being viewed for the same amazon region that you created the stack in. Here this is in London (eu-west-2) as shown in the top right-hand corner.
6. Removing the project
If we want to stop collecting data, then the stack can be removed.
$ serverless remove
Depending on the access restrictions this command may not remove the data from the buckets. If you have permissions they can be deleted using the below, but be sure to give the name of the correct S3 bucket before you run it
$ aws s3 rm s3://bucket-name --recursive
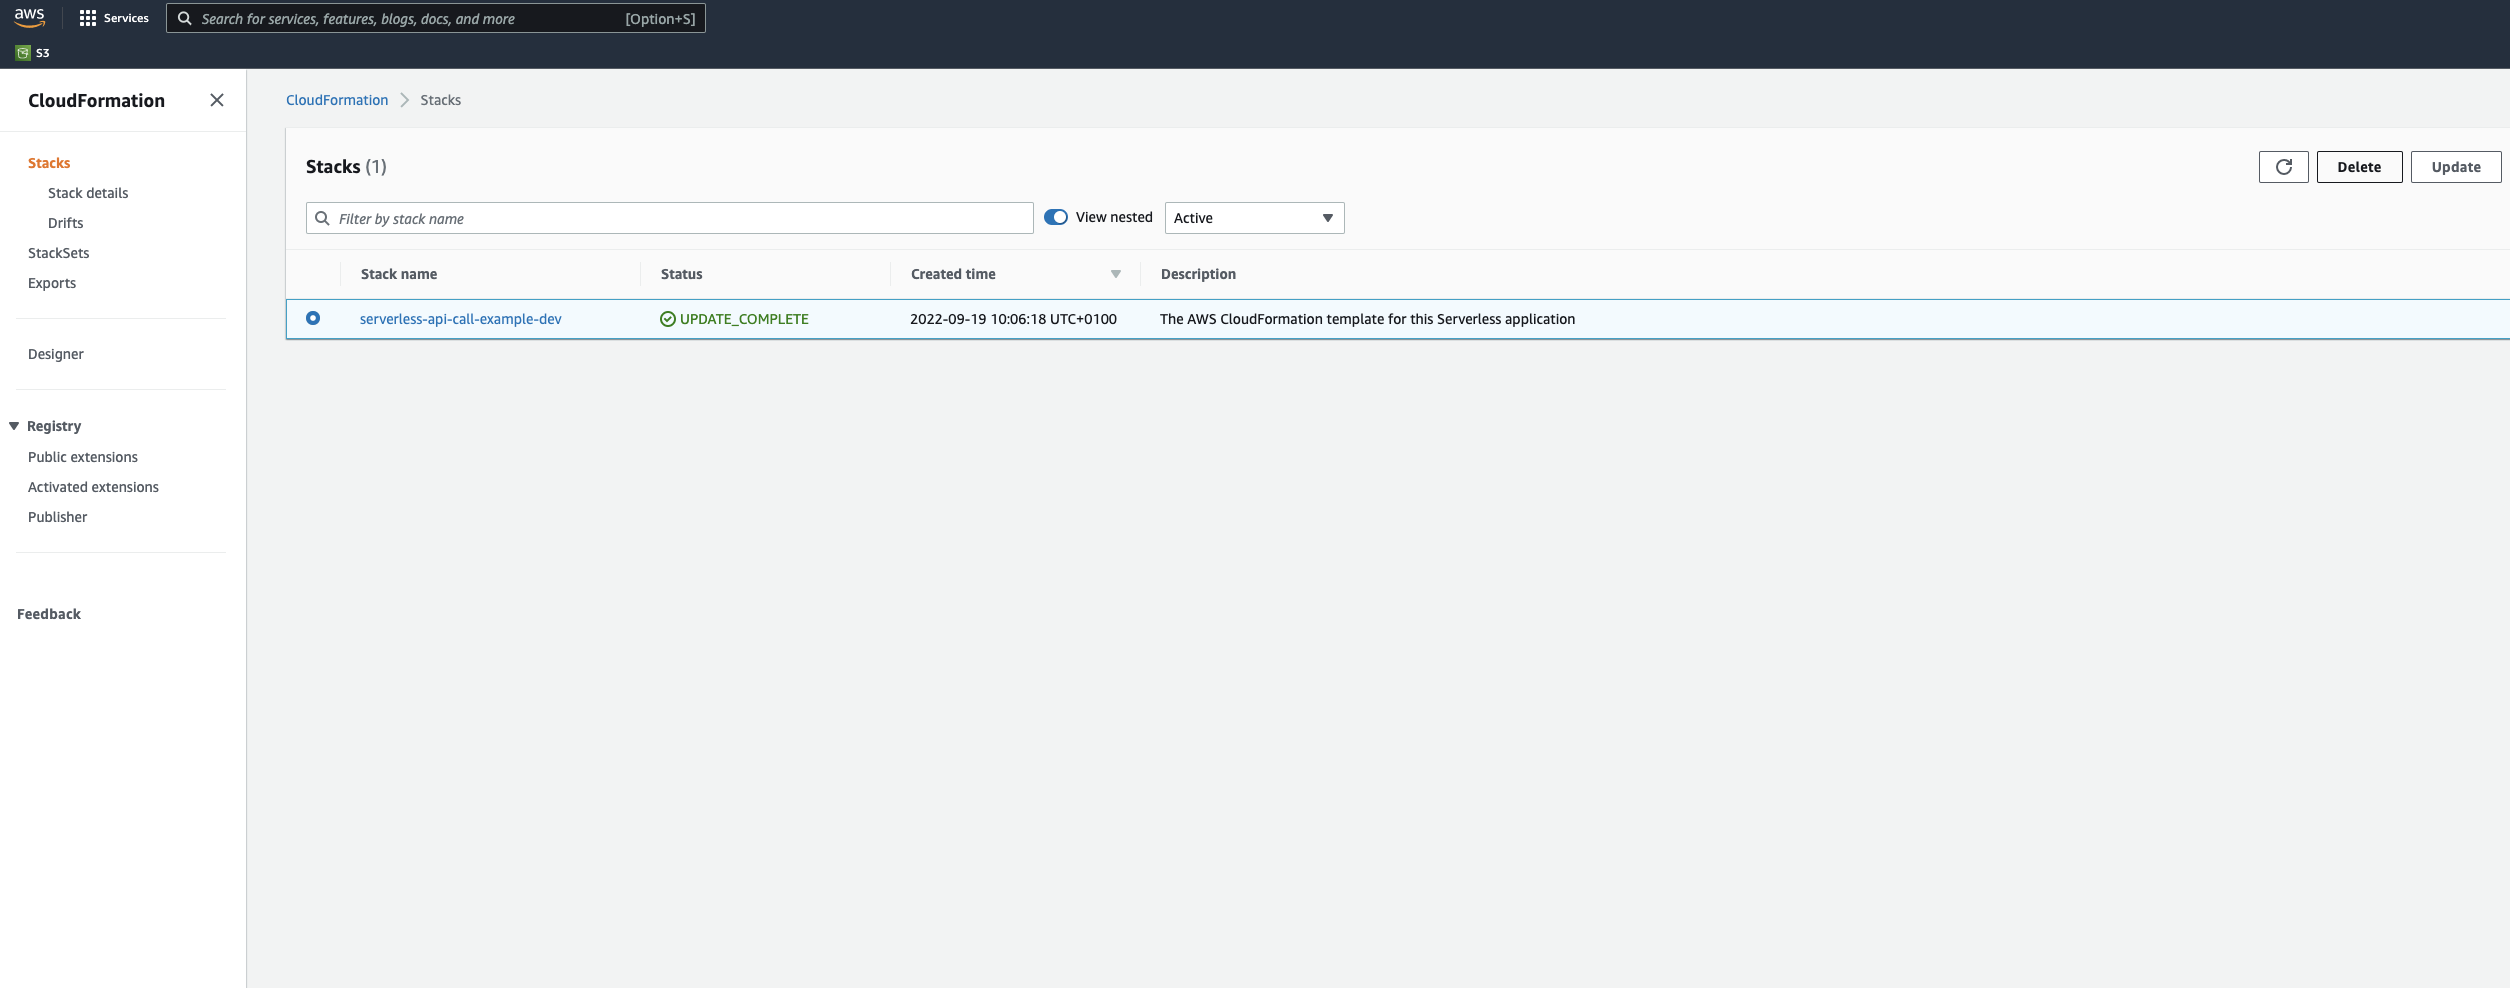
The stack can also be removed by going to CloudFormation through the Services tab of the AWS console, navigating to the Stacks button and deleting the stack via the menu as illustrated below.
Cloud posts:
Cloud 1: Introduction to launching a Virtual Machine in the Cloud
Cloud 2: Getting started with using a Virtual Machine in the Cloud
Cloud 3: Docker and Jupyter notebooks in the Cloud
Cloud 5: Introduction to deploying an app with simple CI/CD
Cloud 6: Introduction to Infrastructure as Code using CloudFormation
Cloud 7: Building an API with Lambda, Docker and CloudFormation
Cloud 8: Automating publishing an Android app to Google Play with GitHub Actions
References
Dan Frost, ‘Serverless: Deploy on AWS’, Linux Format 2019 Annual
Andreas and Michael Wittig, ‘Amazon Web Services in action, 2nd edition’, Manning.
Anomaly Innovations, ‘Serverless Stack’