
Patrick Staff’s ‘On Venus’ at the Serpentine gallery
Deploying a web app with Continuous Integration and Continuous Deployment (CI/CD)
Introduction
The last post used a Serverless approach to regularly search Twitter for particular words and then stored the corresponding Tweet data in a cloud database. Here we develop a simple Streamlit app that accesses the database and creates a page showing average daily sentiment on the topic. We then deploy the app in the cloud. To do this we use many of the tools from previous posts combined with some new ones.
I wrote this to learn more about:
Continuous Integration (CI)
The process where before integration of code changes into the main project codebase automated testing is run.
Continuous Deployment (CD)
The process where, once testing has happened, and the changes integrated into the main code branch, the changes are automatically released to the public product.
At a high level deploying the app involves:
1. Building a Docker container image to hold the app
2. Deploying the container to a virtual machine to make the app available
It is possible to do these stages manually (as the post on using Jupyter notebooks in virtual machines does, here we automate this using GitHub Actions.
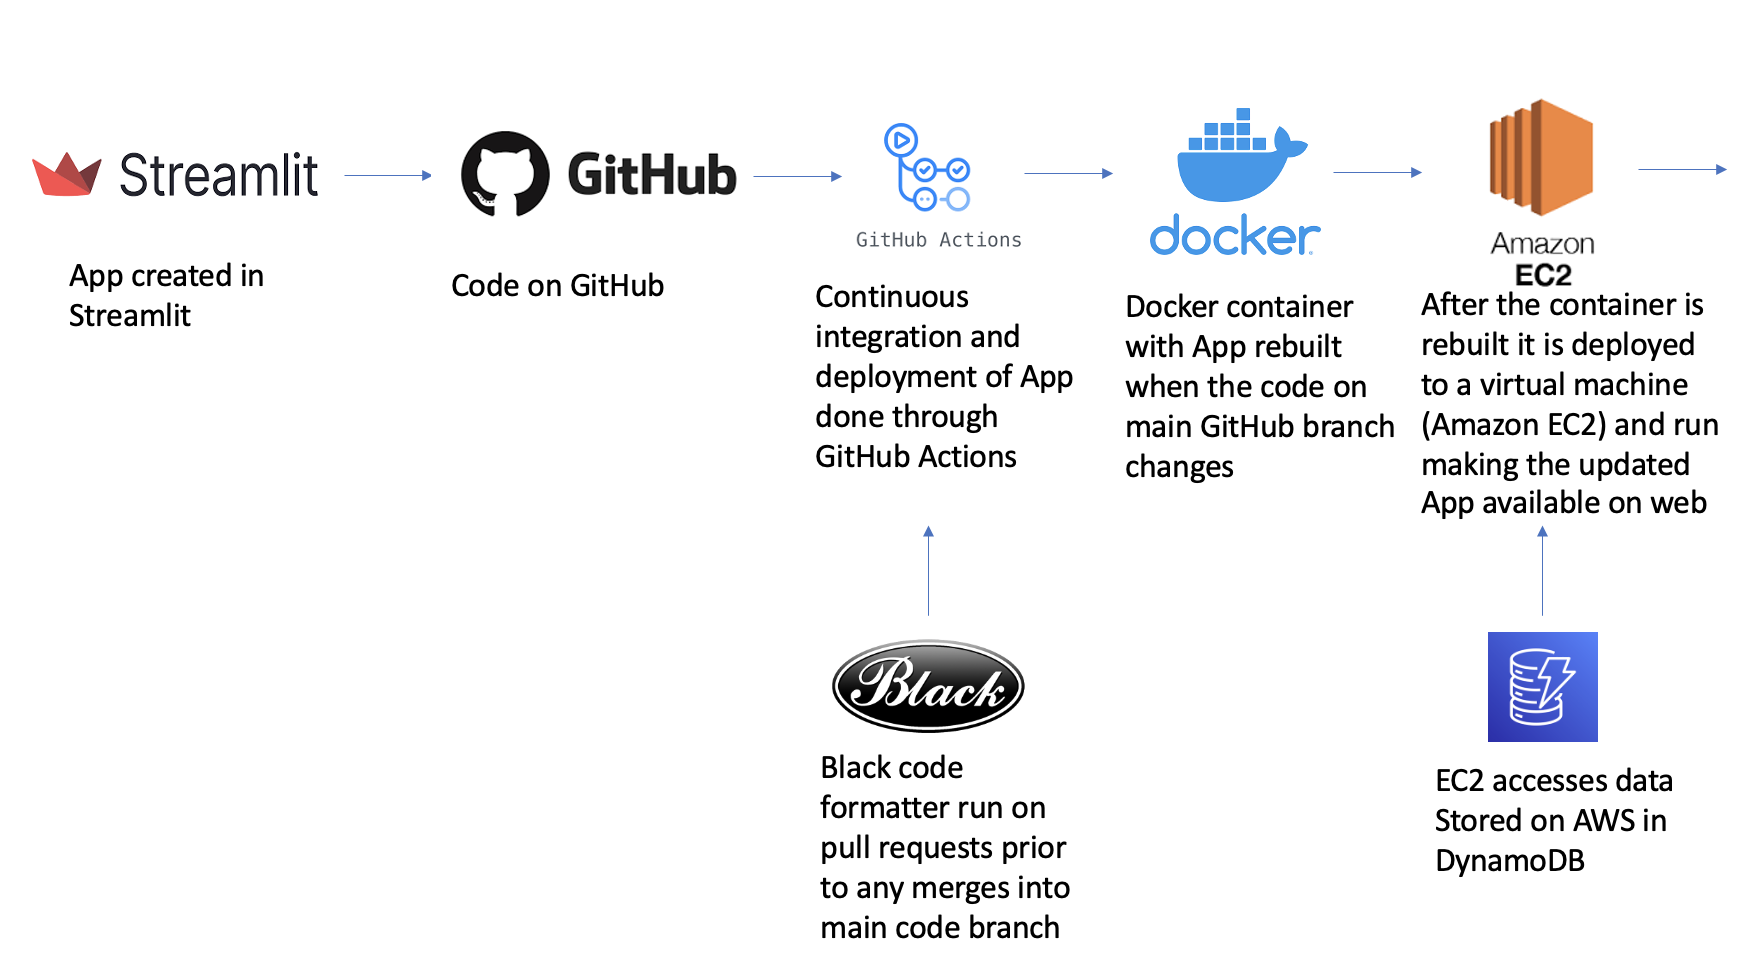
We have a very simple form of continuous integration - when we want to merge changes on GitHub from the working branch into the app’s main branch we run a code formatter over the app code to check for any formatting errors. Once this has been done we automatically deploy the new app to the virtual machine running in the cloud (continuous deployment). The schematic below gives a high-level summary of the pipeline.
Cloud warning: The activities in this and the previous post it builds on will incur costs from running cloud services. Costs should always be monitored and services turned off to avoid incurring unwanted expense. In addition this post involves linking multiple cloud services which can potentially cause security issues. Care should be taken not to commit keys and secrets in git and to avoid giving any unnecessary access to services.
The following sections cover:
1. Creating a Streamlit app that accesses the cloud database
2. Developing a Docker container to hold the app in
3. Producing a basic CI system that automatically formats new code changes
4. Having a basic CD system that when the app’s code changes rebuilds the Docker container image and runs it on the virtual machine
1. Creating a Streamlit app that accesses the cloud database
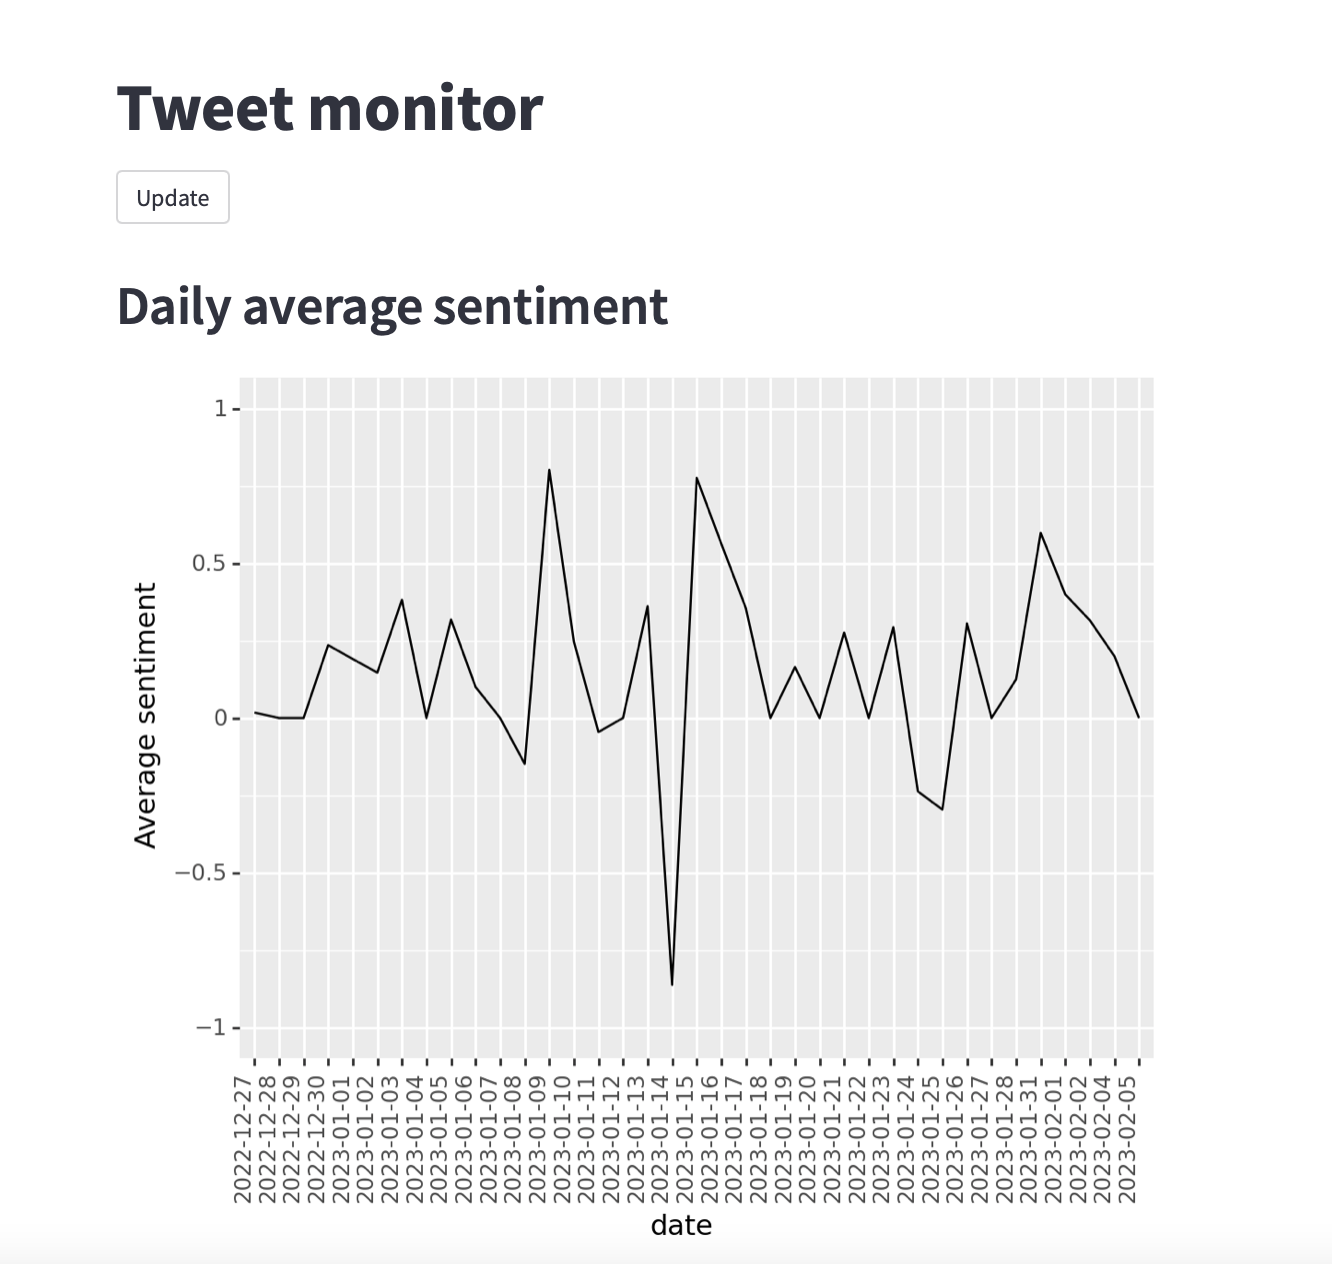
The python script below generates a very simple app, which we will deploy to the cloud. It accesses the Twitter data that is stored in an Amazon Web Services (AWS) DynamoDB, runs the Vader sentiment analyser over the collected tweets and calculates the average sentiment per day. It then generates a chart of this information with ggplot and converts this to a webpage with Streamlit.
import boto3
import pandas as pd
from vaderSentiment.vaderSentiment import SentimentIntensityAnalyzer
from plotnine import *
import streamlit as st

# Imports the AWS key and secret to access the database.
# Delete this direct import before the script is deployed See discussion later.
from aws_auth import *

# Gives a streamlit app title
st.title("Twitter sentiment monitor")

st.button("Update")

# Connect to DynamoDB with the boto3 library
# Delete the aws key and secret lines before deploying
dynamodb = boto3.resource(
    "dynamodb"
    , aws_access_key_id=APP_KEY
    , aws_secret_access_key=APP_SECRET
)

# Connect to the dynamodb table apicallstore
dynamodb = boto3.resource("dynamodb")
table = dynamodb.Table("apicallstore")

# Read in the table and extract the tweets
response = table.scan()
data = response["Items"]

# Keep collecting results as long as there is a last evaluated key
while 'LastEvaluatedKey' in response:
         response = table.scan(ExclusiveStartKey=response['LastEvaluatedKey'])
         data.extend(response['Items'])

# Takes the data from DynamoDB and turn it into a data frame
df = pd.DataFrame(data)


# # Sentiment analysis

analyser = SentimentIntensityAnalyzer()


def print_sentiment_scores(sentence):
        try:
            snt = analyser.polarity_scores(sentence)
            return snt
        except:
            None


df["polarity_score"] = df["text"].map(print_sentiment_scores)

# Extracts the compound sentiment coefficient. This is the sum of positive, negative & neutral scores
# normalised between -1 (the most negative sentiment) and +1 (most positive sentiment).
df["compound"] = df["polarity_score"].apply(lambda x: x["compound"])


df["date"] = pd.to_datetime(df["created_at"]).dt.date


# Calculates the average daily sentiment
sent_date = df[["date", "compound"]].groupby("date").mean()
sent_date = sent_date.reset_index()

# Create a chart of the average daily sentiment
daily_average = (
    ggplot(sent_date, aes(x="date", y="compound", group=1))
    + geom_line()
    + ylab("Average sentiment")
    + theme(axis_text_x=element_text(rotation=90, hjust=1))
    + ylim(-1, 1)
)

# Make the chart available through Streamlit and add a header
st.header("Comparing daily average sentiment")
st.pyplot(ggplot.draw(daily_average))
In this example the serverless pipeline was set up to find tweets with the word London, so the script (which is called London_tweet_monitor.py) will calculate average daily sentiment of a sample of regularly collected tweets that in some way relate to “London”. The sentiment can range between -1 (most negative) and 1 (most positive).
In order for the script to run locally it needs access to the AWS key and secret credentials which give permission to read from the database (Here imported in the aws_auth.py file) and a virtual environment which has the relevant dependencies. The key and secret credentials should be obtained from an Identity Access Management (IAM) role that gives just read-only access to the data, as we want to limit the permissions to use AWS services. For instructions on how to set up a read-only IAM role for DynamodDB, see the two tutorials on this subject linked at the bottom of this post. The script can be deployed locally from the command line using the command below.
$ streamlit run London_tweet_monitor.py
This produces a simple app running locally on http://localhost:xxxx that shows the average daily sentiment (where xxxx is the port number, in this example we will use port 8009).
2. Developing a Docker container to hold the app in
To ensure the app can run on another machine we create the Dockerfile below which will generate a container image to hold the app. This container image can then be deployed to a virtual machine in the cloud with Docker and run as it has all the dependencies needed. The requirements.txt that is referenced has been generated from the virtual environment used to run the app script locally.
# app/Dockerfile

# Start with a base python image
FROM python:3.9-slim

# Open port 8009
EXPOSE 8009

# Create a directory called app
RUN mkdir app

# Copy the python file for the app and the requirements file to the app folder in the container
# These should be in the same folder locally with the Dockerfile
COPY  London_tweet_monitor.py requirements.txt /app

# Switch the working directory to the app folder
WORKDIR /app

# Run some basic installations
RUN apt-get update && apt-get install -y \
    build-essential \
    software-properties-common \
    git \
    && rm -rf /var/lib/apt/lists/*


#Install the latest version of pip and packages specified in the requirements file such as Streamlit
RUN pip install --upgrade pip
RUN pip3  install -r  requirements.txt

# Run the streamlit app
ENTRYPOINT ["streamlit", "run", "London_tweet_monitor.py", "--server.port=8009", "--server.address=0.0.0.0"]
In what follows we assume that file for the Streamlit app London_tweet_monitor.py along with the Dockerfile and requirements.txt have been committed and pushed to the main branch of the GitHub repo that has been set up for the project. Prior to deployment the lines that were used to import the credentials locally should be removed e.g. from aws_auth import *, aws_access_key_id=APP_KEY and the aws_secret_access_key=APP_SECRET. A different approach is used to obtain the credentials needed to access DynamoDB in the cloud which is covered later.
3. Producing a basic CI system that automatically formats new code changes
We use GitHub Actions to trigger various activities based on changes made in GitHub. A new action can be generated by clicking the GitHub repo’s Actions tab and then the New workflow tab.
 This will prompt you with a screen showing some of the workflows that are available. Here we will write a new Action so click on
 set up a workflow yourself. Copying the code below into the GitHub editor and saving will create a file with this text in the directory .github/workflows where GitHub Actions are defined. Here we do a basic test to the code using the Black formatter. To link this to your GitHub add your user name and associated email into the script in the relevant lines. The structure of the Action is as follows:
- name: What the Action is called. Here Black.
- on: The event that triggers the action. Here the event is a pull request on the main branch of the GitHub repo.
- jobs: The workflow comprises a series of jobs.
- runs-on: specifies where the Action is run. Here an ubuntu virtual machine that GitHub is providing to the Action.
- uses: Other Actions that the Action uses. Here:
checkout@v3which checks out the GitHub repo so the Action can work with it.setup-python@v2which allows the Action to use a version of python, so we can install Black and run it.
- run: The commands that are run. Here a series of python and Git commands to install and run the Black formatter and then commit the changes that have been made.
name: Black

on:
 pull_request:
    branches:
      - main

jobs:
  format:
    runs-on: ubuntu-latest
    steps:
     # Download the code to the environment with checkout@v2 the reference (ref) is needed to allow the commit created by the Action to be added to the branch
      - uses: actions/checkout@v3
        with:
           fetch-depth: 0
           ref: ${{ github.event.pull_request.head.ref }}
      - uses: actions/setup-python@v2
        with:
          python-version: 3.8
      - run: |
          python -m pip install black
          # Runs black on the python files
          black $(git ls-files '*.py')
          git config --global user.email "GitHub user email"
          git config --global user.name "GitHub user name"
          # Adds and commits with a message with the -am flag. The code after || is used if first part fails
          git commit -am "Format code with Black" || echo "No changes to commit"
          # pushes it
          git push
When working on a separate branch from the main branch and opening a pull request the Black formatter will now be applied to the code in the branch. When the pull request is created, as shown below, after a few seconds a GitHub Actions in progress symbol will appear showing that the Black formatter is running.
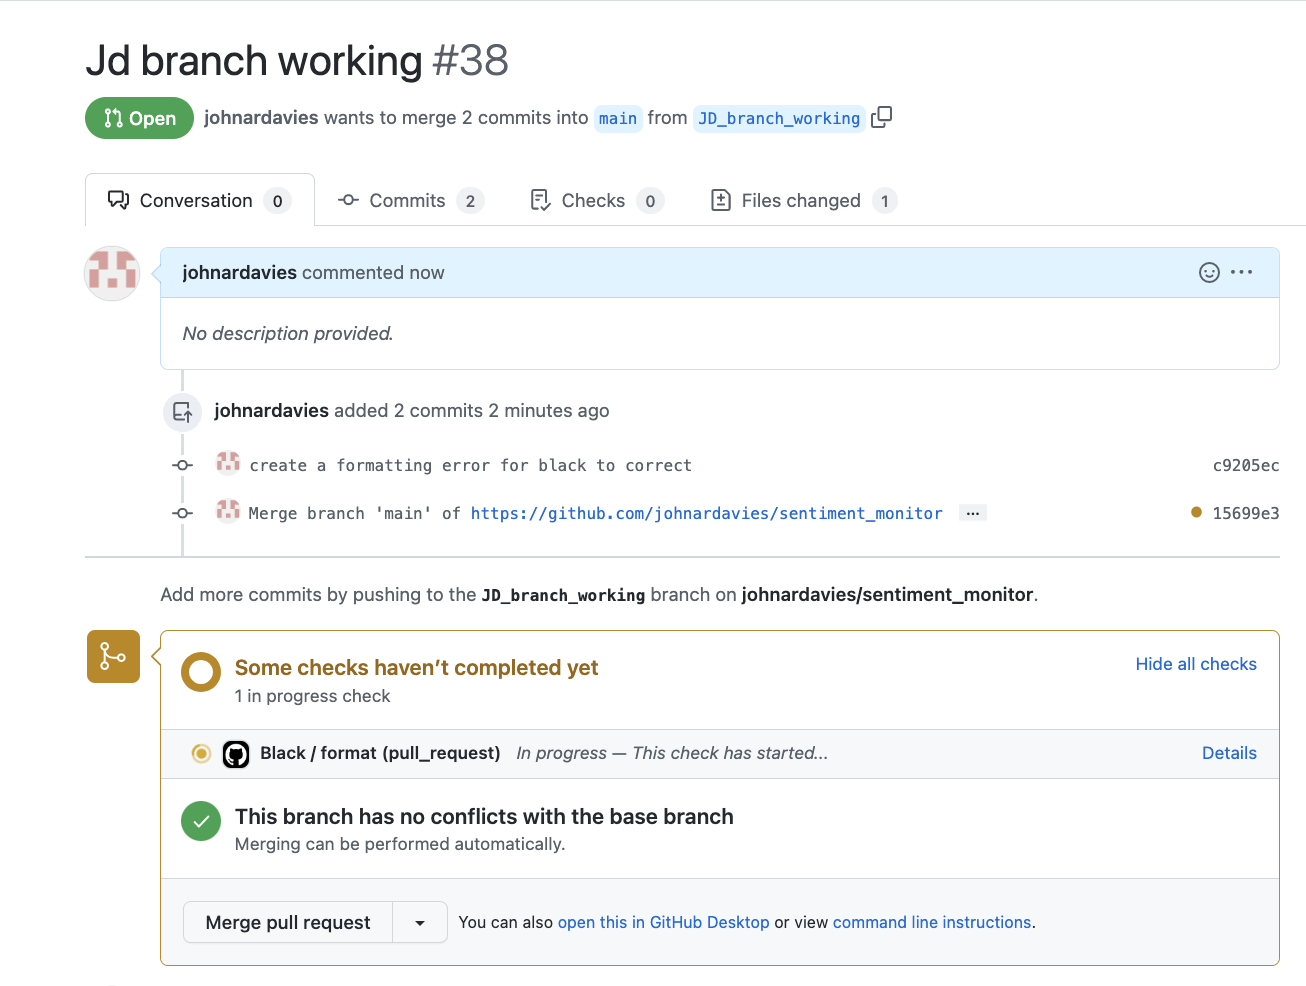 Black will then create another commit that fixes formatting issues that it has identified so that the pull requests into the main branch are always formatted to the Black standard. Below is an example of how the GitHub Actions commit has automatically fixed the formatting errors for the chart in the python script.
 If you click on the Actions tab you will be able to track the Action’s operations as it runs.
4. Having a basic CD system that when the app’s code changes rebuilds the Docker container image and runs it on the virtual machine
Having the Streamlit App and the Docker file we now use GitHub Actions to take the code on GitHub and automatically deploy it. This involves when the code is changed on the main GitHub branch:
1. building a new Docker container image for it
2. running it on the virtual machine to make the changes available
We cover these in section 4.1 and section 4.2. To do this we set up a new GitHub Action with the following code. The parts labelled as Part 1 and Part 2 in the code below correspond to the different stages. Here we store the container image that the Action creates on Docker Hub (container image storage options are a standard offer from cloud providers so one could use another option such as the AWS Elastic Container Registry or the DigitalOcean Container Registry).
name: Build and Publish Docker container
on:
  push:
    branches:
      - main

jobs:
  # define job to build and publish docker image
  build-and-push-docker-image:
    name: Build Docker image and push to repositories
    runs-on: ubuntu-latest

    steps:
      # Part 1: Rebuilding the container image on DockerHub
      - name: Checkout
        uses: actions/checkout@v3

      - name: Set up Docker Buildx
        uses: docker/setup-buildx-action@v2

      - name: Login to DockerHub
        uses: docker/login-action@v2
        with:
          username: ${{ secrets.DOCKERHUB_USERNAME }}
          password: ${{ secrets.DOCKERHUB_TOKEN }}

      - name: Build and push
        uses: docker/build-push-action@v4
        with:
          context: ./
          file: ./Dockerfile
          push: true
          tags:  ${{secrets.DOCKERHUB_USERNAME}}/sentiment_monitor:latest

      # Part 2: Deploying the container image to the EC2 instance
      - name: executing remote ssh commands using ssh key
        # Action to ssh into the EC2
        uses: appleboy/ssh-action@v0.1.7
        with:
         host: ${{ secrets.HOST }}
         username: ${{ secrets.USERNAME }}
         key: ${{ secrets.KEY }}
         port: ${{ secrets.PORT }}
         script: |
           # Stop any running containers
           docker stop $(docker ps -a -q)
           # Delete the stopped containers
           docker rm $(docker ps -a -q)
           # Login to Docker Hub
           docker login -u ${{ secrets.DOCKERHUB_USERNAME }} -p ${{ secrets.DOCKERHUB_TOKEN }}
           # Pull down the container image from Docker Hub
           docker pull  ${{ secrets.DOCKERHUB_USERNAME }}/sentiment_monitor:latest
           # Run the image in detached mode sending the container's output port 8009 to external port 8009
           docker run --detach -p 8009:8009  ${{ secrets.DOCKERHUB_USERNAME }}/sentiment_monitor:latest
4.1 Updating the container on Docker Hub when the code on the main branch on GitHub changes
4.1.1 Giving GitHub access to the Docker Hub container repository
Going to Docker Hub we select Create repository and start a new private repository called sentiment_monitor and create a DockerHub access token. The access token can be generated by going to the Account Settings button and then the Security tab.
We need to use security credentials to connect all the pieces of the pipeline together e.g. to allow the GitHub Action to access Docker Hub and login to the EC2 virtual machine. We don’t want to write any of this information directly in the code as it poses a security risk and is hard to remove once committed to Git.
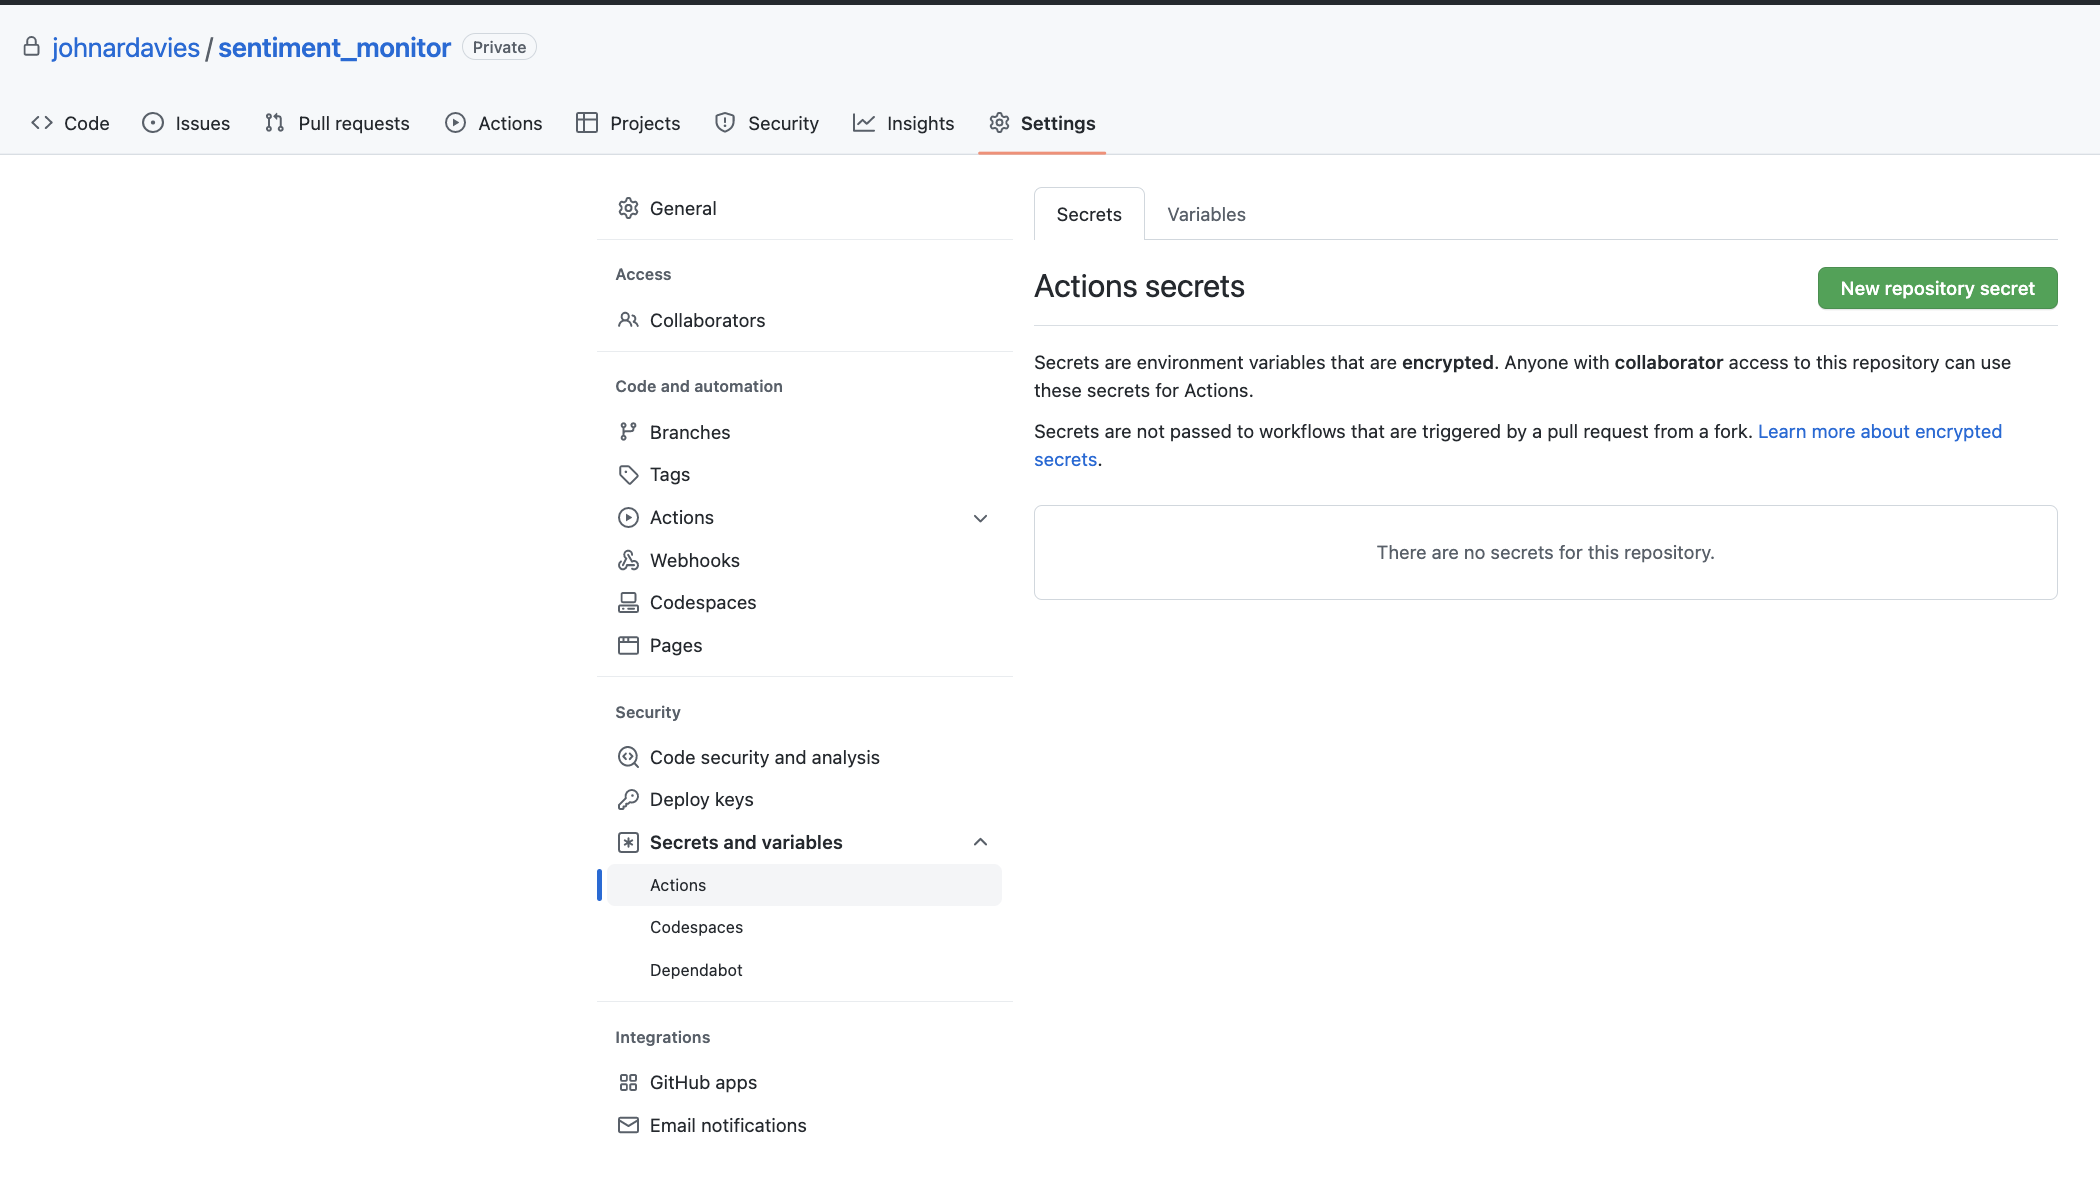
For the Docker Hub and EC2 login information we use the Secrets store of GitHub Actions. This can be found by going to the Settings tab in the project’s GitHub repo and scrolling down to the Security tab and selecting the Actions tab under Secrets and variables as shown in the image below. The secrets are added in here
 and are then injected through the curly brackets in the Actions script with the secrets prefix e.g. ${{ secrets.DOCKERHUB_TOKEN }} inserts the access token we have created and added as a secret called DOCKERHUB_TOKEN into the script.
In the secrets tab of GitHub Actions we add two pieces of information DOCKERHUB_TOKEN, DOCKERHUB_USERNAME that will allow the GitHub Action to access the Docker Hub and the repository where the container image is stored.
4.1.2 Having the Action rebuild the container image that is available on Docker Hub
The action code uses a succession of pre-existing actions in Part 1 to rebuild the container image on Docker Hub following a push to the main code branch on GitHub:
- actions/checkout@v3 checks out the existing code which the push has changed
- docker/setup-buildx-action@v2 an action that allows containers to be built
- docker/login-action@v2 logs into Docker Hub using the credentials that added as secrets
- docker/build-push-action@v4 builds and pushes the container image to Docker Hub
Now when a change is made to the main branch of the repo the GitHub Actions can log into Docker Hub and rebuild the container image on the Hub based on the latest version of the app code.
4.2 Deploy the container from GitHub to EC2 after a change to the code running in the container
After the Action has rebuilt the container image (Part 1) we now have it deploy the container to EC2 (Part 2). For simplicity we have the EC2 already running (for a guide on setting up an EC2 on AWS see this tutorial from Kostas Stathoulopoulos - in this case as the application is not computationally intensive a GPU is not needed). To allow the GitHub Action to pull down the container image from Docker Hub and for the image to be run successfully we need to enable permissions to allow 1. the GitHub Action to login to the virtual machine and 2. allow the virtual machine to read from the DynamoDB database where the data is.
4.2.1 Giving GitHub Actions the ability to log into the virtual machine
An EC2 instance will have a name along the lines of ubuntu@ec2-xx-xxx-xx-xxx.region.compute.amazonaws.com (Where xxs are numbers and region is an AWS region e.g. eu-west-2). The part before the @ is the username and the part after is the host (This is the default setting for an ubuntu virtual machine, with another operating system or created user account the user name will be different. To allow us to ssh into the virtual machine from GitHub in the GitHub Actions secrets we add HOST (In this example ec2-18-170-44-111.eu-west-2.compute.amazonaws.com) and USERNAME as ubuntu. The SSH key is also copied into the GitHub secrets (here labelled KEY) to allow the Action to login (this should be the full key including all the text in the key file). The port that is used for SSH is also added as PORT (Typically it is 22). Assuming the EC2 instance is accessible using SSH keys only (without a password) the GitHub Actions will then be able to log into the EC2 instance.
4.2.2 Giving the EC2 instance the ability to read data from the DynamoDB database
To give the EC2 instance access to the DynamoDB database we attach the IAM role to the instance that gives read only access to the DynamoDB database. Once the IAM role has been added to the instance, then it will automatically be able to access the credentials to read data from DynamoDB - there is no need to reference or import credentials in the script which is why they were removed previously.
4.2.3 Deploying the container
When the code has been pushed to GitHub, after having:
- Tested the branched code with the Black formatter before branches are merged into the main branch (The first Action)
- Updated the Docker container image on DockerHub using the changed code (Part 1 of the second Action)
Part 2 of the second action uses the pre-existing action appleboy/ssh-action@v0.1.7 which allows the Action to SSH into the EC2 using the credentials that were added. The GitHub Action will then stop the existing container which is running on the EC2 and delete it. The Action will then pull down the new container image from Docker Hub and run it. This takes a few minutes. In this example the app will be available at http://ec2-18-170-44-111.eu-west-2.compute.amazonaws.com:8009/ i.e. port 8009 of the EC2 instance it is being run on. The app will be up and running using the code in the latest container image. This could all be done manually, but is now automated with GitHub Actions. As an example if we add the following code which generates average hourly sentiment into the python file from another branch.
# # Sentiment by hour

sent_hour=df[["hour", "compound"]].groupby(["hour"]).mean()
sent_hour=sent_hour.reset_index()


days_by_hour=ggplot(sent_hour , aes(x='hour', y='compound')) + geom_line()+ylab("Average sentiment")+ylim(-1,1)

st.header('Average hourly sentiment')
st.pyplot(ggplot.draw(days_by_hour))
Then it will automatically be reformatted by our action running the Black formatter as:
# # Sentiment by hour

sent_hour = df[["hour", "compound"]].groupby(["hour"]).mean()
sent_hour = sent_hour.reset_index()


days_by_hour = (
    ggplot(sent_hour, aes(x="hour", y="compound"))
    + glom_line()
    + ylab("Average sentiment")
    + ylim(-1, 1)
)

st.header("Average hourly sentiment")
st.pyplot(ggplot.draw(days_by_hour))
When this change is pulled into the main branch the container image on Docker Hub will be updated, pulled down to the EC2 instance and run, and the served page updated automatically with the changes to the below.

Extensions
Although this example illustrates some basic CI/CD for learning purposes, it does not pretend to be fully optimised. Things to improve include:
Caching the data As it is currently the app is reading in all the data from DynamoDB and does so each time it is reloaded. This is inefficient and will pose issues as the amount of data increases so it would probably be better to have the app cache the processed data it has loaded to date and only import the latest raw data that has been collected.
https and not http
This currently serves the app with http and not https, converting it to https would require setting up certificates.
Managing the images
The container images that have been run are all stored on the EC2 instance when they are pulled down. On a small EC2 instance, which is what it should be deployed on, this will eventually fill up the memory. If we want to retain them the container images should be moved to a lower cost storage solution with more capacity or deleted if no longer needed.
Cloud posts:
Cloud 1: Introduction to launching a Virtual Machine in the Cloud
Cloud 2: Getting started with using a Virtual Machine in the Cloud
Cloud 3: Docker and Jupyter notebooks in the Cloud
Cloud 5: Introduction to deploying an app with simple CI/CD
Cloud 6: Introduction to Infrastructure as Code using CloudFormation
Cloud 7: Building an API with Lambda, Docker and CloudFormation
Cloud 8: Automating publishing an Android app to Google Play with GitHub Actions
References
Deploying Streamlit on Docker
Streamlit doc on Docker deployment
Giving IAM roles access to DynamoDB
Jennelle Cosby, ‘Using AWS IAM roles with EC2 and DynamoDB’
Omar Egal, ‘How to create a DynamoDB table and grant AWS EC2 Read-Only Access’
Launching EC2
Kostas Stathoulopoulos, ‘How to set up a GPU instance for machine learning on AWS’
CI/CD and Docker
Docker Docs, Introduction to GitHub Actions
Minho Jang, ‘CI/CD Hands-On : Github Actions+DockerHub+AWS EC2’
Truong Huu Thao, ‘Full CI/CD with Docker + GitHub Actions + DigitalOcean’
Question on deployment Using GitHub Actions on Digital Ocean