
Es Devlin’s “BLUEWHITESKY” at the 2021 LUX exhibition
More and more of the digital services we use involve the cloud, where the computing is not done on our laptop or mobile, but accessed over the internet. However, coming across its technical details for the first time, the cloud can be slightly opaque to someone whose background is not computing - I certainly found it that way. From a data science perspective working with it involves things that are not related to statistics, machine learning or even programming narrowly defined.
Virtual machines, as the main way to access cloud computing power, are one of the fundamental building blocks of cloud services and an obvious starting point to the topic. In this post I cover:
1. Setting up a virtual machine in the cloud
2. Increasing the security of the machine
3. Stopping the machine and turning it off
A cloud based virtual machine can allow access to much greater computing power than is available on a laptop, enabling data processing and model training to be sped up. Alternatively a less powerful virtual machine can be used to remotely host API calls, webscraping or sites without having to worry about keeping a computer on all the time to run them.
It’s probably true that tools like Google Colab or Serverless are reducing the need for data scientists to directly use virtual machines. However as the cloud increases in importance, knowing more about its core components is useful in general. It also makes it easier to work with different cloud providers as virtual machines are a standard offer.
Prerequisites The prerequisites are some knowledge of the command line and networking. If these are less familiar a good way to learn them, or at least I found it helpful, is to buy a Raspberry Pi and learn how to login remotely to it over your local network (so called “headless login”) as this is similar to many of the steps here - the Raspberry Pi is effectively acting as a remote machine analagous to the virtual machine in the cloud. A benefit of this approach is that (the small electricity bill aside) the cost of doing this is fixed and there are fewer security issues as the Pi won’t be on the public internet.
The instructions should work from a Mac (or PC using Windows subsystem for Linux) as the local machine. The cloud machine will be Linux as this is the most common operating system in the cloud - even on the Microsoft’s Azure cloud platform.
The warning no cloud tutorial is without The cloud can be many things, but one thing it is not is free. Although many cloud platforms have free credits for new users, it is important to look at the cost of services before using them, to regularly monitor usage and costs and to turn things off - otherwise things can get expensive.
1. Setting up a Virtual Machine in the cloud
In this example we use a virtual machine (VM) from the cloud provider Digital Ocean. Digital Ocean call their virtual machines Droplets, but in practice there is a lot of similarity between cloud providers' virtual machines. In large part this is because they are mostly Linux based, although size and capacity (and hence cost) can vary a lot. Using a virtual machine from another provider such as Amazon Web Service’s (AWS) EC2 instance is quite similar, although in the case of AWS there are some different actions in the set-up and the billing is not capped.
After having created an account, navigate to the Create button in Digital Ocean and select Droplets from the dropdown. A screen like the below should then be visible.
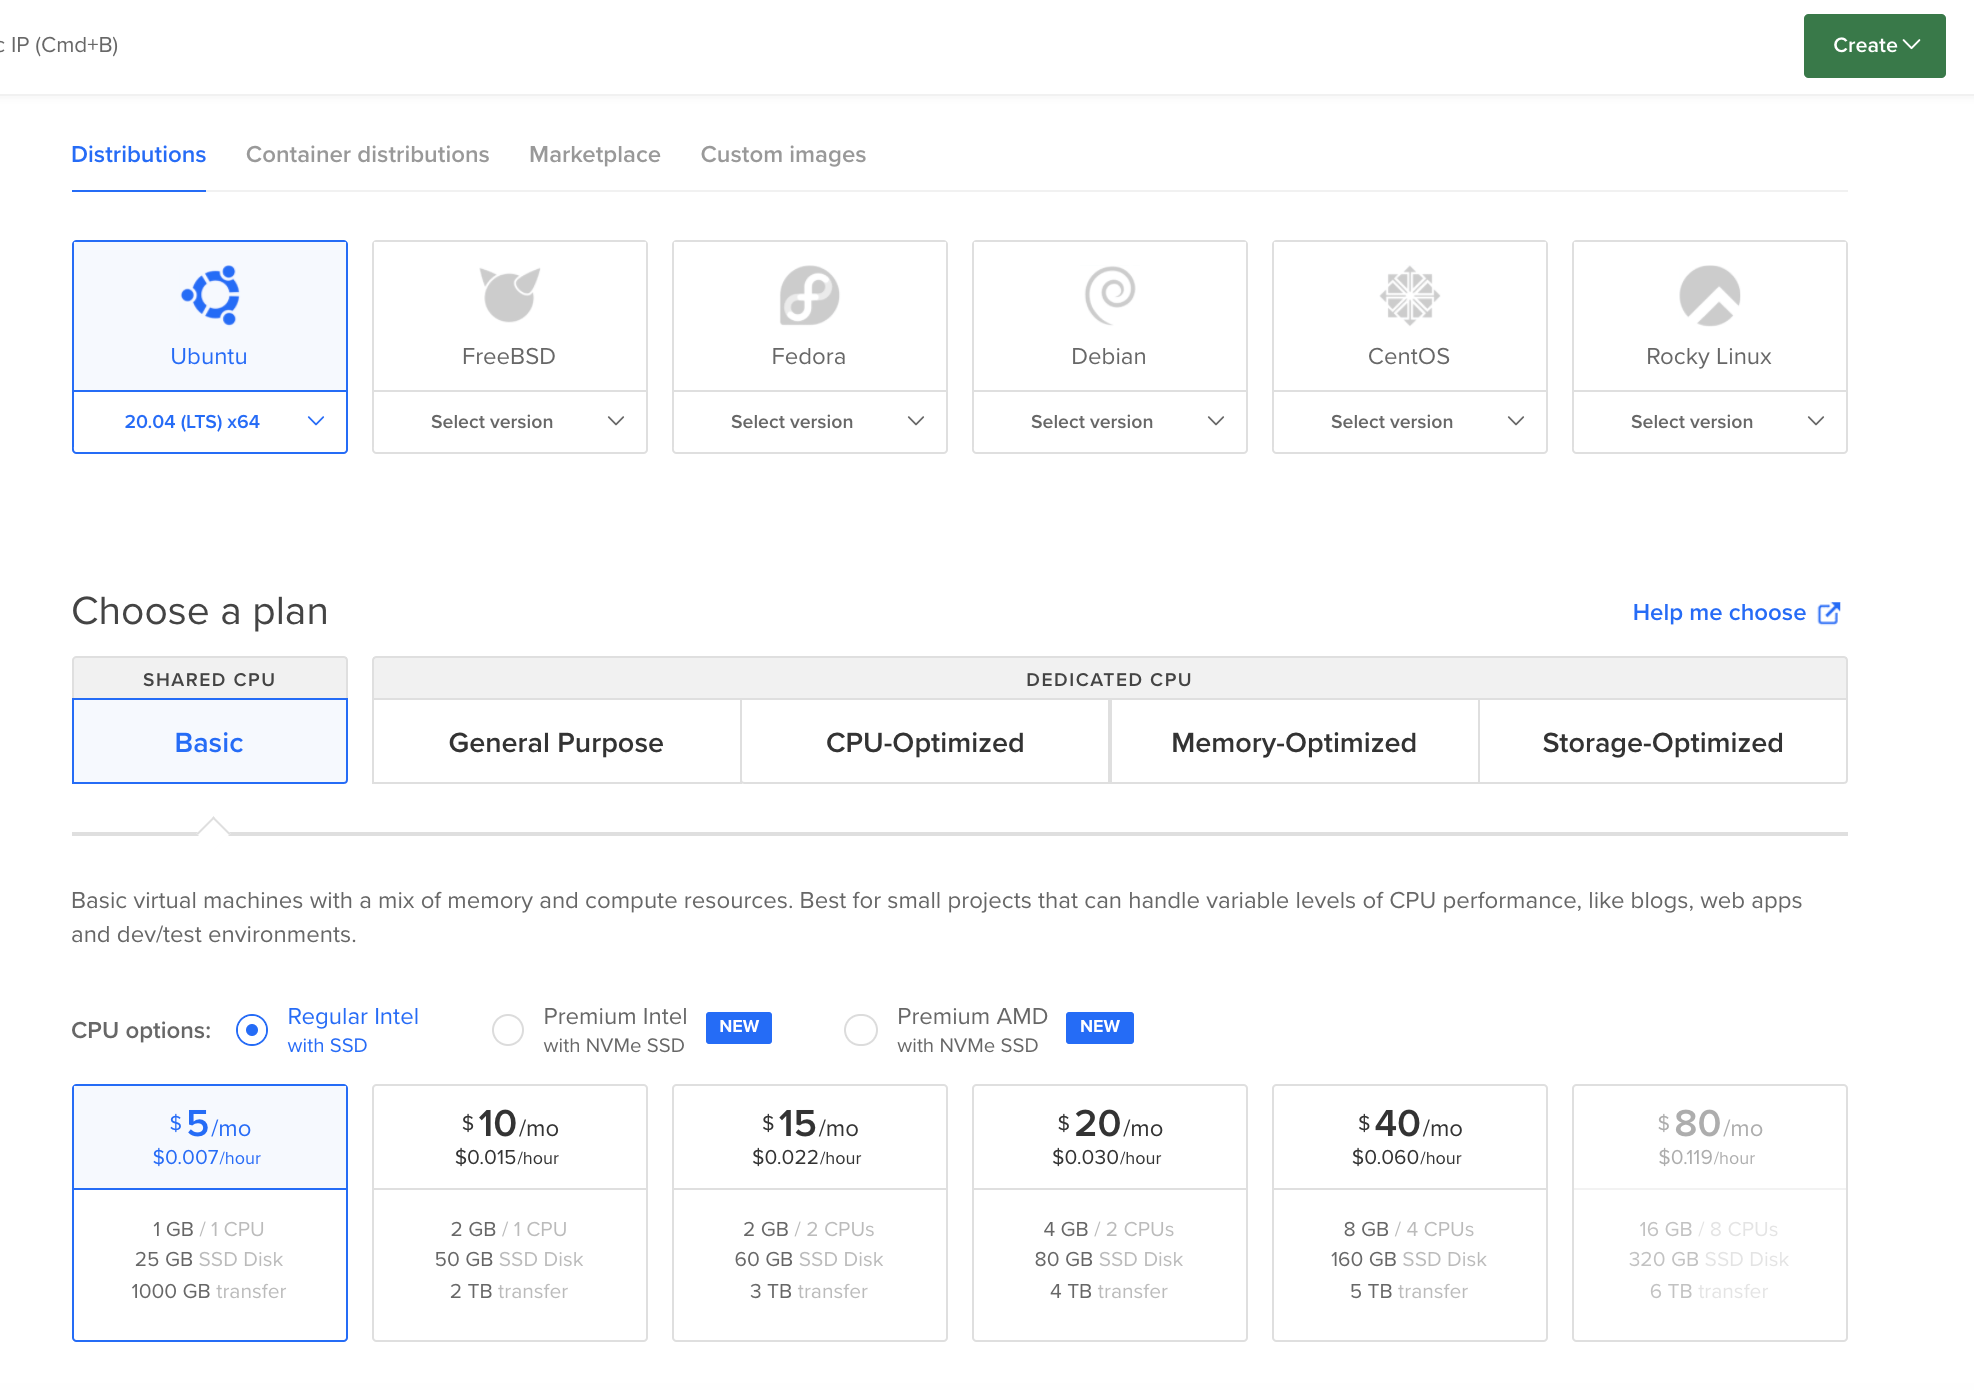 We select an Ubuntu instance version of Linux on the smallest plan cost which is $5 a month. We choose a local datacenter and a form of authentification. From the authentification options we use Secure Shell (SSH) key based authentification, rather than password based login as this is more secure as it also requires an ssh key to login.
If you don’t have an existing key to set up go to the New SSH Key button and follow the steps. To generate a key run $ ssh-keygen from the command line which will then prompt you to give the key a password and save it. This generates a key pair: A private key (id_rsa) and a public key (id_rsa.pub) - these are the default names for the key pair which will be saved to the ssh folder. We share the public key with the virtual machine by running $ cat ~/.ssh/id_rsa.pub to see the public key and copying and pasting this into the indicated field on the web form.
Select the number of droplets you want to launch. In this case 1 and give the droplet a hostname such as test-virtual-machine. Finally when all the fields are complete hit the Create Droplet button at the bottom and the droplet will launch which may take a few seconds.
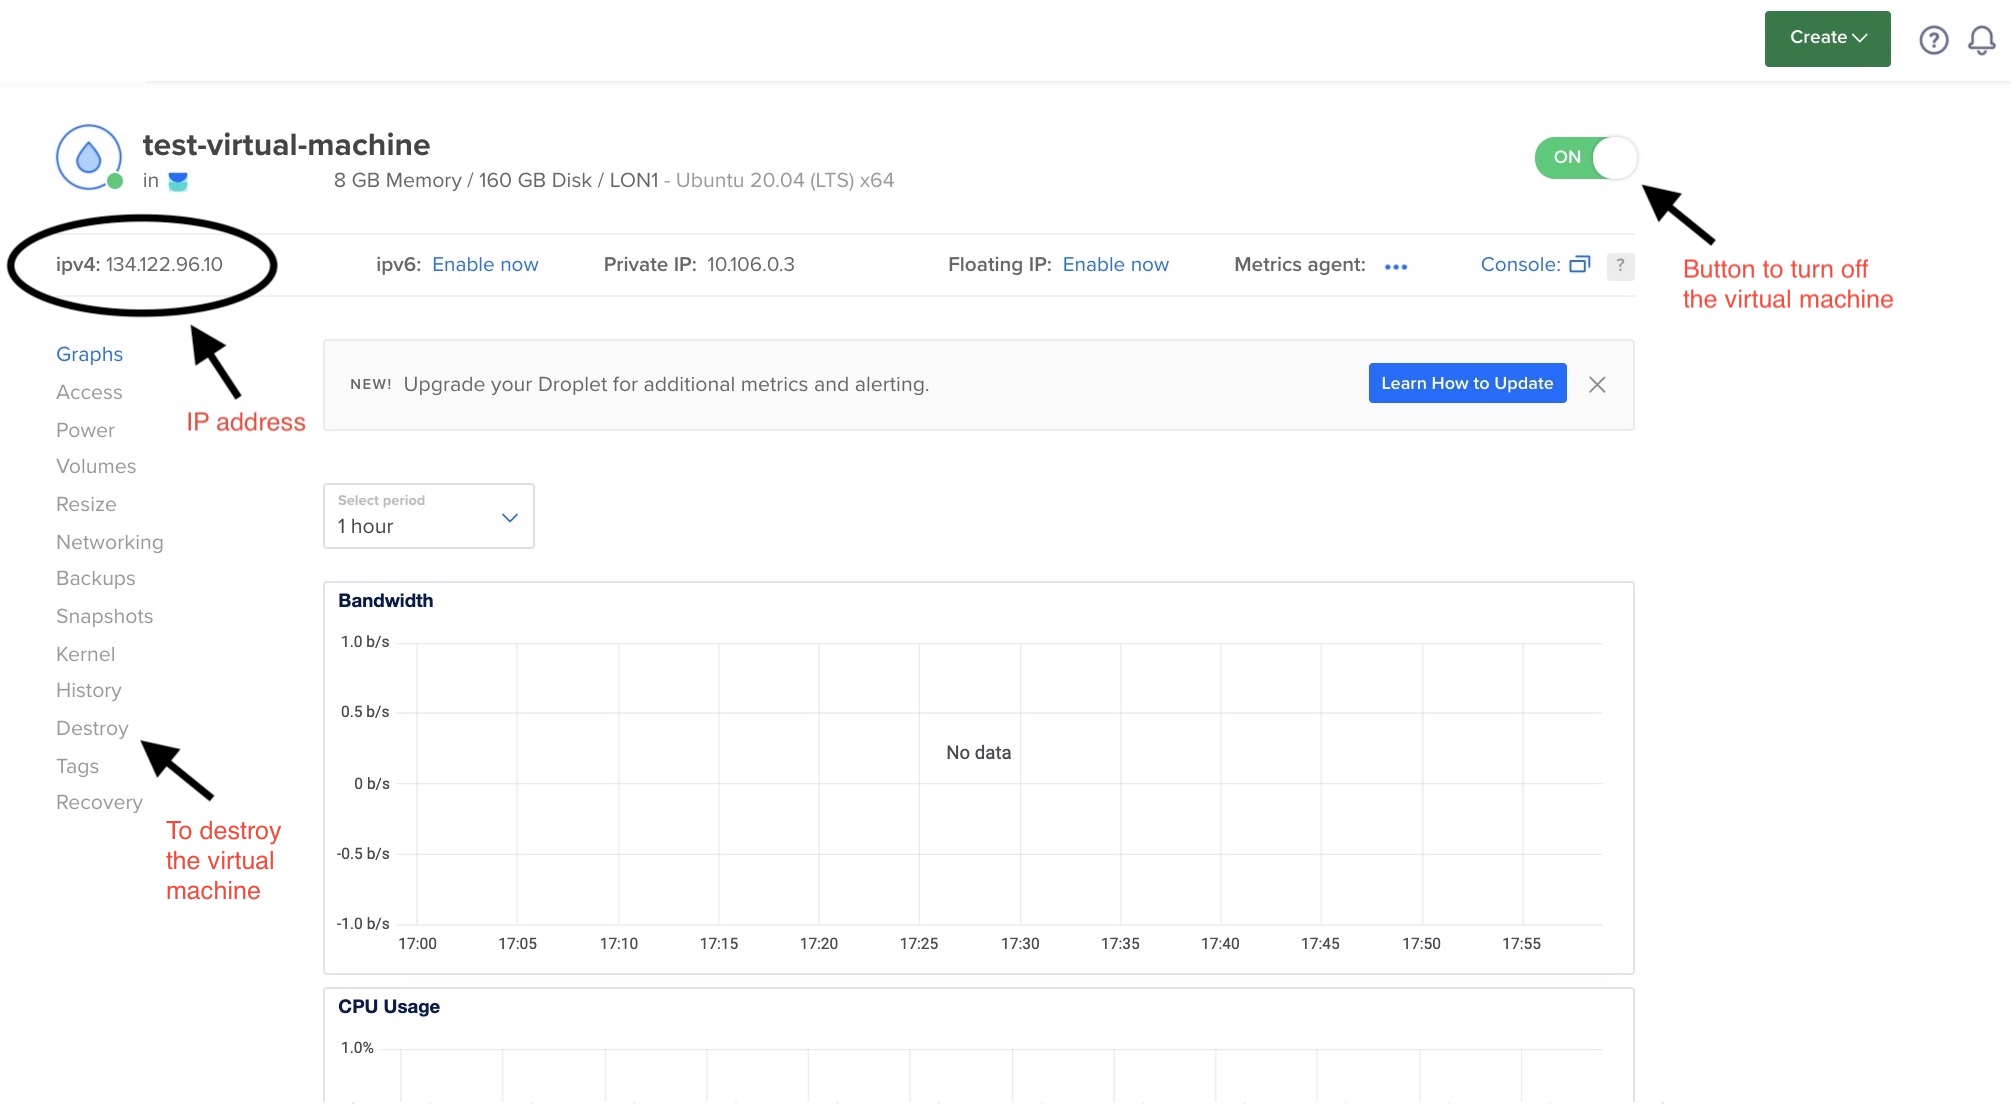
The details of the droplet will be visible (including what its IP address is) by selecting the Droplets tab under Manage.
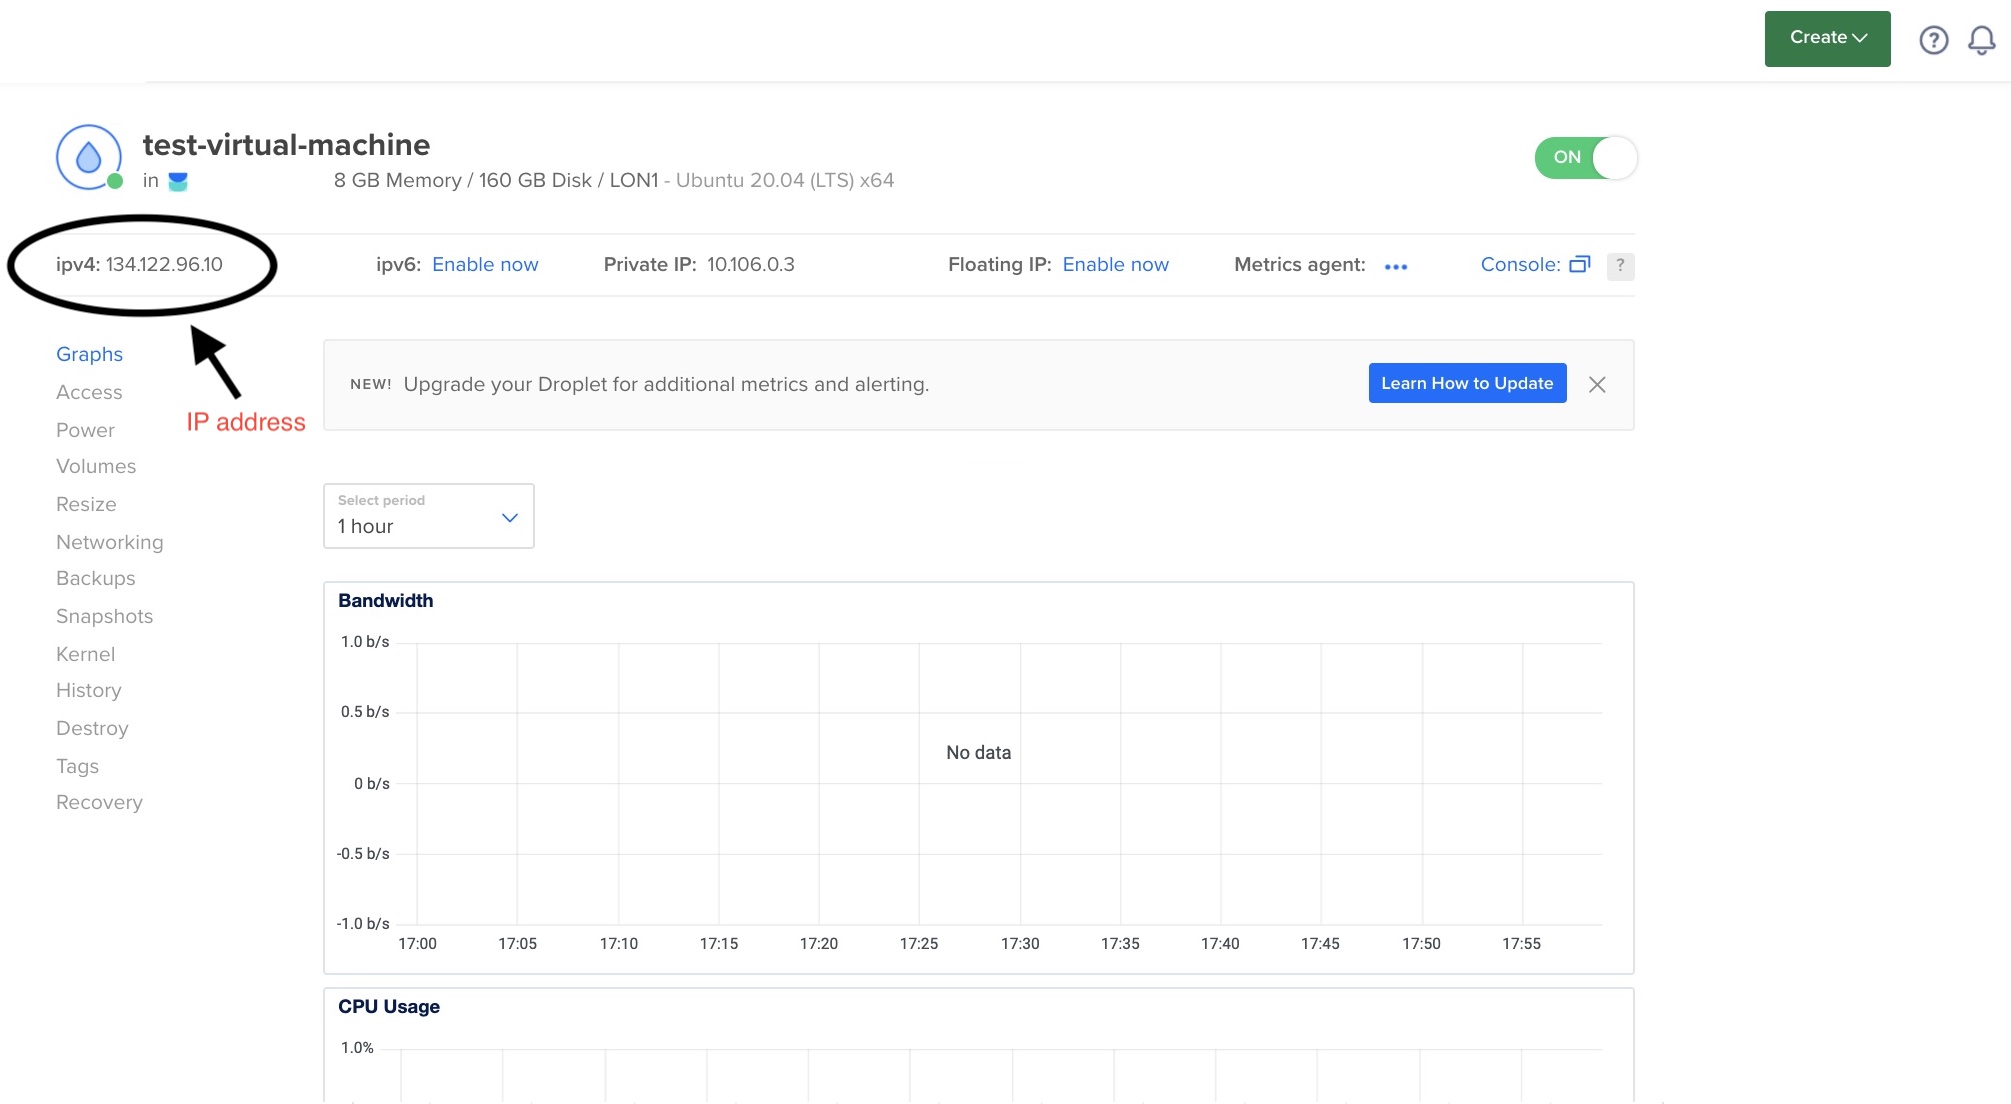
You should then be able to log in from your local machine using the command below where ip_address is replaced by the virtual machine’s IP address:
$ ssh root@ip_address
In the example above the IP address is 134.122.96.10, so the login would be:
$ ssh root@134.122.96.10
If you have multiple ssh keys add the -i flag and the file path to the specific private key you are using:
$ ssh -i /path/to/private_key root@ip_address
The first time you do this the command prompt will say:
Are you sure you want to continue connecting (yes/no)?
Type yes and hit enter, if you have set a key password it will ask for this to be input, and after doing that you should see something like the screen below.
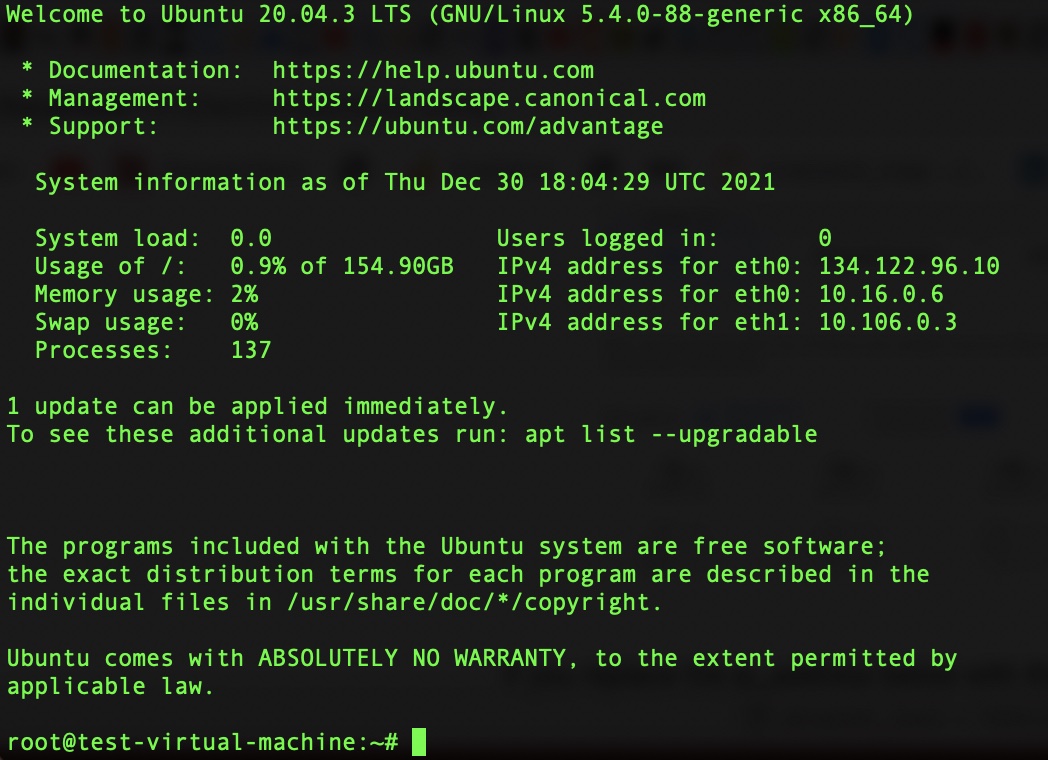
We now have a virtual machine in the cloud that, until turned off, can run programmes remotely or act as web server 24/7. However, it is generally recommended to implement some measures to make it more secure (particularly if it is on for an extended period) so we now do this.
2. Increasing the security of the machine
Unfortunately this stage is necessary as with the virtual machine on the public internet it will quickly be subject to repeated login attempts from bots around the world who are trying to break in.
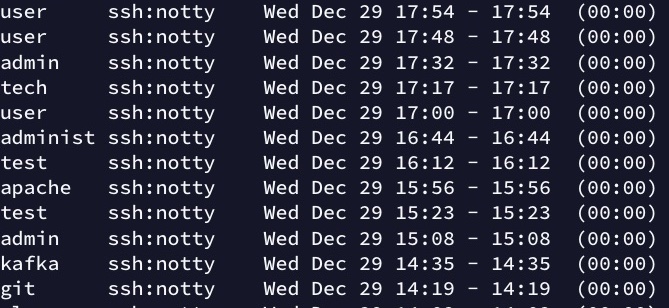
If you want to see these running $ lastb | more from the command line of the virtual machine not long after launching will usually show you a list of failed login attempts on the machine.
A small sample of unwanted visitors
To help make the virtual machine more secure we therefore:
- Activate a Firewall for the virtual machine which restricts how it can be accessed
- Create an account on the machine which has restricted privileges and then only allow access to the machine via that account
In AWS a lot of this is handled through what are known as Identity and Access Managment (IAM) roles. Here we use a standard Linux firewall and restrictions on who has access privileges so this is less dependent on the specifics of Digital Ocean. The commands here should be executed on the virtual machine unless stated otherwise.
2.1 Activate a Firewall
To reduce the scope to access the machine we use a firewall to block access to all but one of the virtual machine’s ports leaving the only means of access the login ssh.
- Installing Uncomplicated Firewall (UFW). If UFW is not already installed, the following command will install the latest version. The cursor now appears as # as we are logged in as root on the machine (The account with the highest level of privilege) e.g. root@test-virtual-machine.
# apt install ufw
- Allow ssh connections. Once the firewall is activated this will allow connections with ssh on port 22, which is the standard port for SSH.
# ufw allow ssh
- Enable ufw to run. The default is to deny all incoming connections and allow all outgoing connections. If access via ssh not enabled before doing this there is a risk of getting locked out.
# ufw enable
- Check to see if ufw is running.
# ufw status
- Restrict the rate at which SSH connections can be formed (as can be seen in the example above bots often target the ssh port) - this blocks connections from IPs that have attempted 6 or more connections in past 30 seconds.
# ufw limit ssh
The image below shows what this process should look like in the terminal.
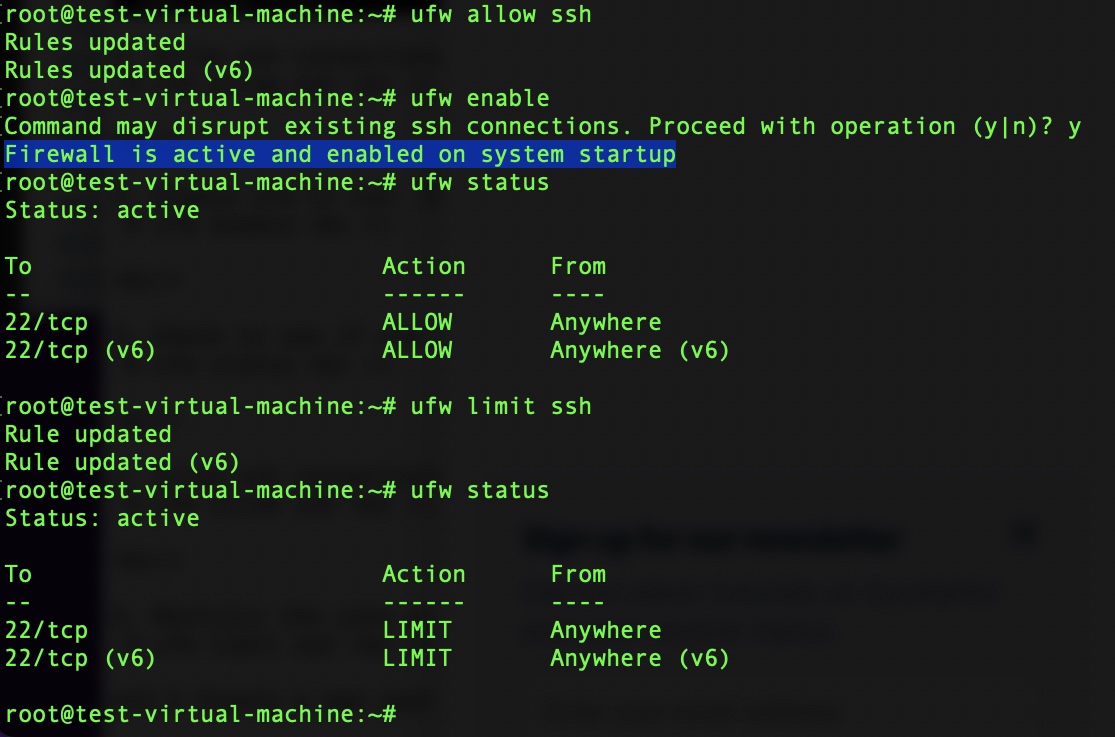 An additional firewall restriction one could impose would be to restrict access to the machine to just your home IP address, which would block the remote logins. The configuration in the example does not do this as it allows access from “Anywhere”.
There are further security measures one can implement such as Fail2Ban which will block IP addresses if they make incorrect login attempts more than a set number of times.
2.2 Create a new user account and prevent access with unrestricted privileges
We create a user account which we will use to log into the virtual machine going ahead and then remove the direct root access. The reason for doing this is that the default way of logging in with root access gives the user unlimited privileges on the virtual machine. This means that if someone broke in with the root access default they can do what they want - including locking us out of the system (although there are ways to restore this from the web console). Allowing access to the root privileges from a new account only with a password restricts this from happening as someone who got access to the machine would also need to force the user password to get this level of control.
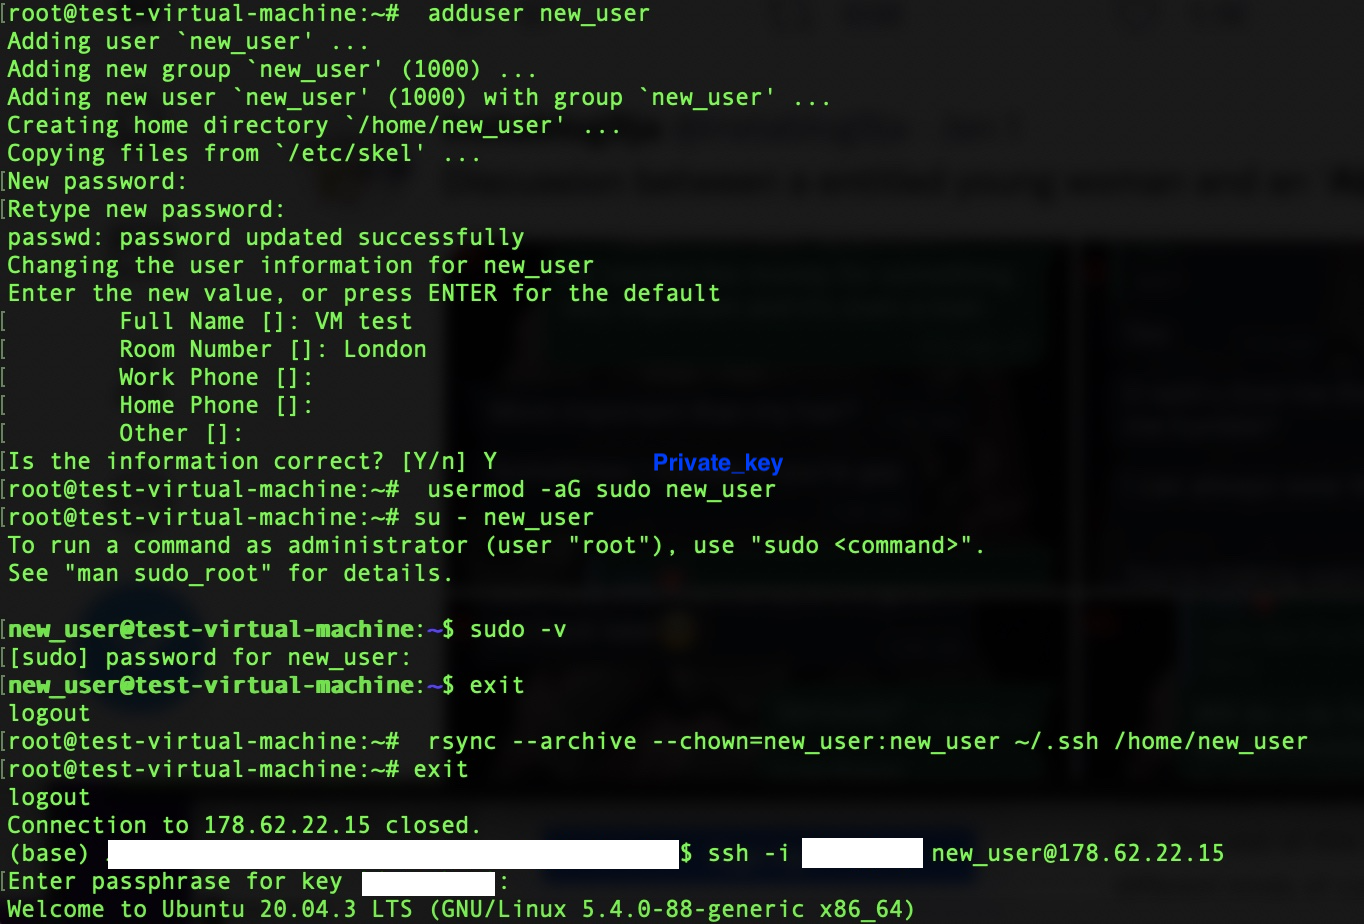
- To create a new user account on the machine, here called new_user, run the below. The machine will ask you to create a password for the user and to input some information on the user.
# adduser new_user
- Give the user ‘new_user’ the administrator access privileges by adding them to the sudo (superuser do) group (This is what the -aG command does).
# usermod -aG sudo new_user
- Check you can get the sudo access. Running
# su - new_userwill switch to the new_user accountnew_user@test-virtual-machine. Then run$ sudo -v, which will ask for the password you set up for the new user in 1. and if input correctly verifies that new_user has sudo access. The password is needed to access sudo going ahead.
- Type
exitto switch back to root from new_user and assuming we want to use the same key for the new user as we did to login originally copy the key details over to the new user.# rsync --archive --chown=new_user:new_user ~/.ssh /home/new_userWhen doing this check ~/.ssh is not written as ~/.ssh/ as if this happens it will copy the contents of the ssh directory, but not its folder structure which will mean ssh can’t find the key.
- Now log out of root to switch to your local machine by typing
exitand check you can ssh into the virtual machine from your computer as the new user with the following command, it will ask for the key password (not the password for the new_user).
$ ssh -i /path/to/private_key new_user@ip_address
What these stages look like is shown in the example below. Some information has been removed.
- Assuming you can login as the new user, edit the sshd_config to forbid root logins with the following command
$ sudo nano /etc/ssh/sshd_configand change the PermitRootLogin line so it readsPermitRootLogin no
If logging in as the new user is not possible then there is a risk of being locked out when you make this change while running as root.
- Restart the service so that the changes take effect.
$ sudo service sshd restart
From now on log in as the new user
$ ssh -i /path/to/private_key new_user@ip_address
If the virtual machine is on for an extended length of time it is also important to make sure it is kept up to date using $ sudo apt-get update && apt-get upgrade. The update command updates the list of available packages and upgrade installs the latest version of the packages that the machine has.
3. Stopping the machine and turning it off
To log out of the virtual machine and leave it running
$ exit will log you out.
The following command run from the virtual machine will stop it running and turn its power off:
$ sudo shutdown -h now.
This will disrupt running processes, but retain files that were already saved allowing it to be restarted.
You can also turn off the machine from the web interface which will maintain its state if you relaunch it.
You will still be billed for the virtual machine while stopped, to stop the billing you also have delete the machine and its contents.
To do this there is a tab on the web interface marked Destroy.
The terminology is similar with AWS where EC2 virtual machine instances are ‘stopped’ and ‘terminated’.
Sources:
Digital Ocean, “How to Connect to your Droplet with OpenSSH” https://docs.digitalocean.com/products/droplets/how-to/connect-with-ssh/openssh/
Brian Boucheron and Erika Heidi (2021), “How To Set Up a Firewall with UFW on Ubuntu 18.04”. This gives more detail on ufw settings. https://www.digitalocean.com/community/tutorials/how-to-set-up-a-firewall-with-ufw-on-ubuntu-18-04
Vivek Gite, “Open SSH server best practices”. This has a detailed review on ssh security techniques for servers. https://www.cyberciti.biz/tips/linux-unix-bsd-openssh-server-best-practices.html#comments
For AWS
For a guide on setting up a virtual machine for machine learning on Amazon:
Kostas Stathoulopoulos, How to set up a GPU instance for machine learning on AWS
https://kstathou.medium.com/how-to-set-up-a-gpu-instance-for-machine-learning-on-aws-b4fb8ba51a7c
For a book on AWS in general Andreas and Michael Wittig, ‘Amazon Web Services in action’, Manning.
Other cloud posts:
Cloud 1: Introduction to launching a Virtual Machine in the Cloud
Cloud 2: Getting started with using a Virtual Machine in the Cloud
Cloud 3: Docker and Jupyter notebooks in the Cloud
Cloud 5: Introduction to deploying an app with simple CI/CD
Cloud 6: Introduction to Infrastructure as Code using CloudFormation
Cloud 7: Building an API with Lambda, Docker and CloudFormation
Cloud 8: Automating publishing an Android app to Google Play with GitHub Actions